This is a 7 inch glass fruit bowl, speckled reds, blues, greens and yellows, purples even. Whilst its adequacy is very questionable and not exactly legal, but absolutely spectacular when lit. A rare find these days if any still exist. i wish this photo was in colour… B&W just doesn’t do it justice. Imagine rolling into a rally with this gem on high beam.
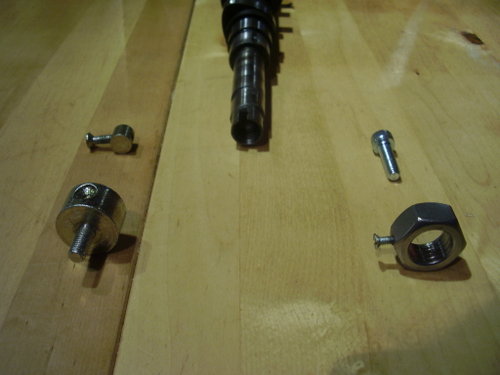
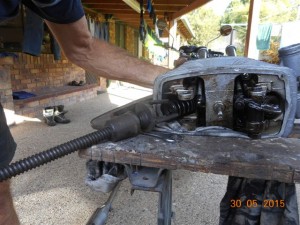
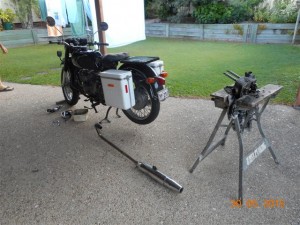
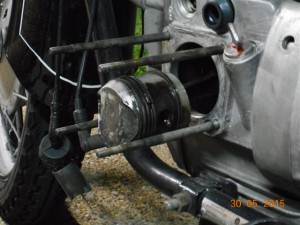
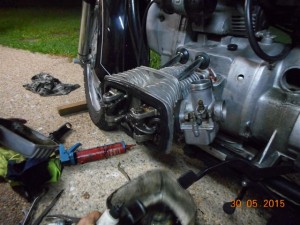
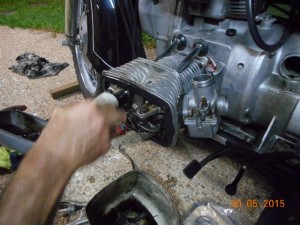
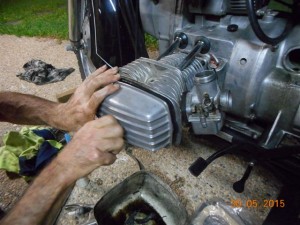
When I needed a set of new header pipes, couldn’t find anyone with correct radius bender to make them. Solution was to make two small bends with a straight section, so two backpressure points. Inceased backpressure and it ran and sounded better.
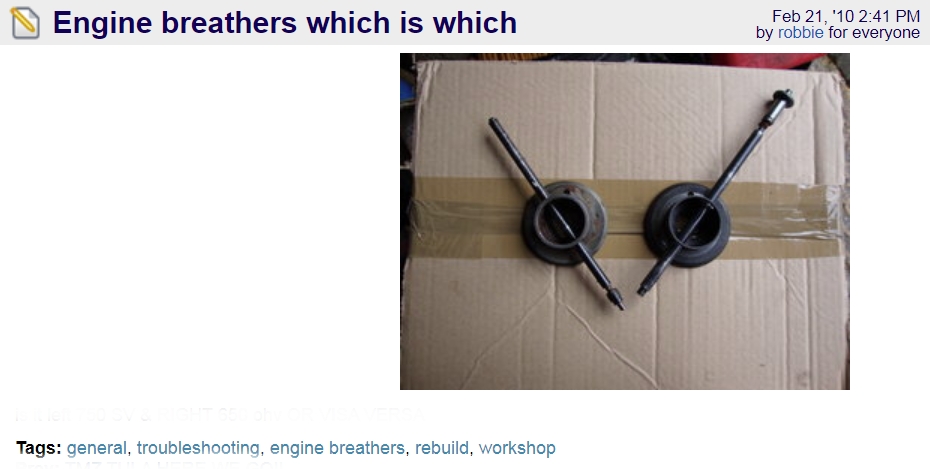
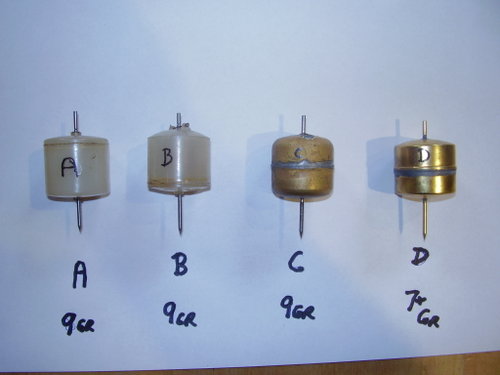
From Robbie (Chunky) Shergold’s on the old site in 2010. Robbie also built up a Tula 3-wheeler into the best Tula little camper on the planet! Chunk UR legend! Robbie has queried why there is more than one type of engine breather used on the USSR boxers and why are they different? That’s a good question. Imagine a newbie trying to restore an old engine from a box of bits that could well be a mix of Ural, Dnepr, and even older M-72 parts. Reading this might save someone one hell of a headache. Thanks Robbie for bringing this topic up.
Robbie: is it left 750 SV & RIGHT 650 OHV or VISA VERSA?
comment: JD: Robbie let’s look at your photo again. What would the effect be if the wrong one was put in? A real Murphy’s Law moment!
comment: Roma: 650 OHV left and 750 SV right. This is how it is with my MT11 and MV750.
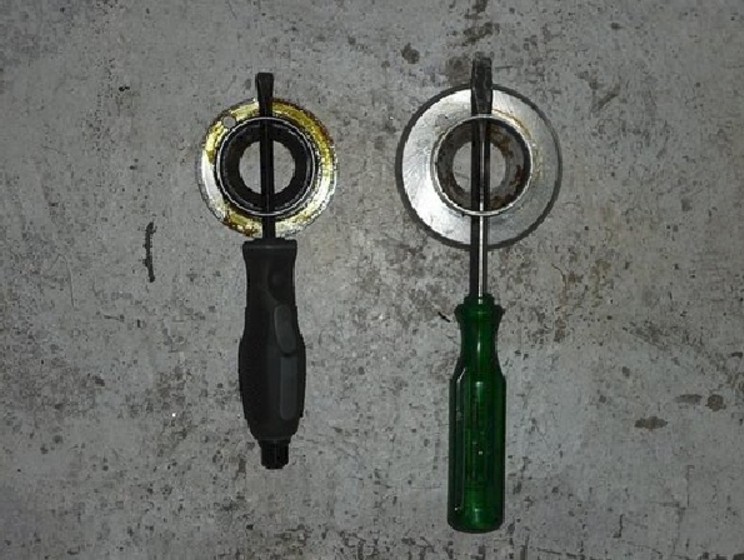
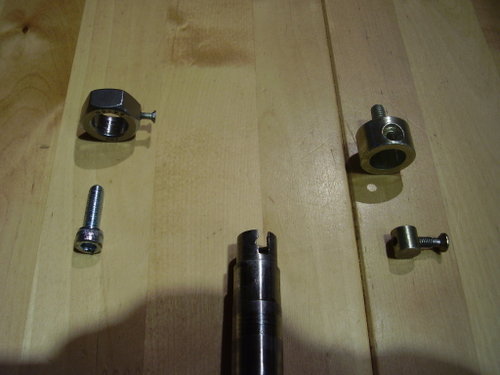
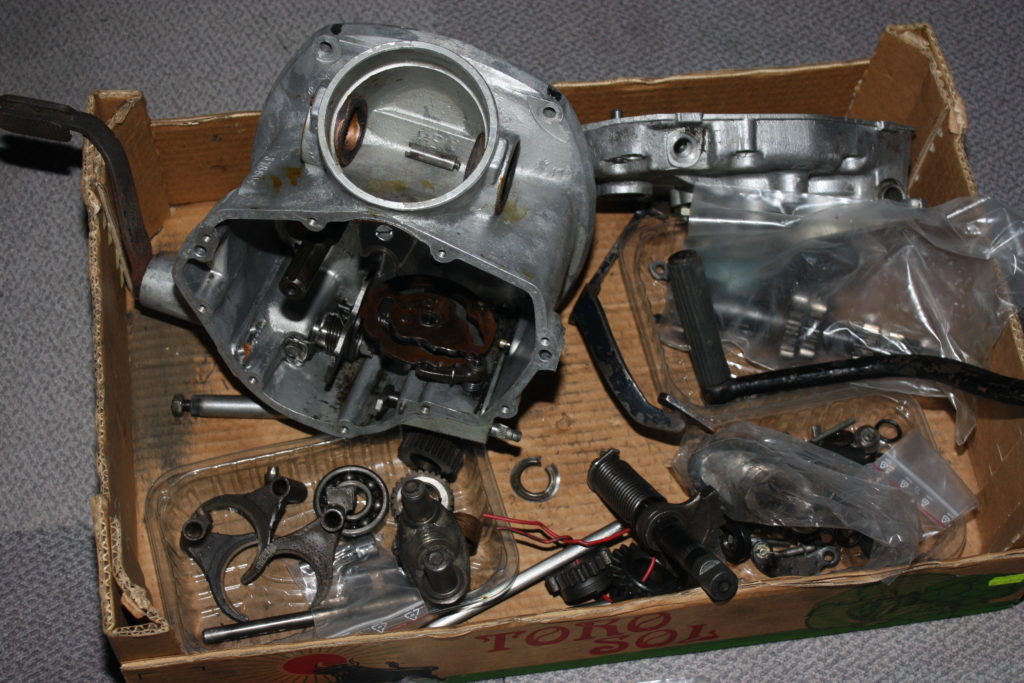
comment: Robbie: Thanks Roma & JD, I will have to pop off the front cover & check what is in the MT12 (SV Ed.) she seems to run fine plenty of grunt & go perhaps its the the added crankcase pressure or not as the case maybe. BTW the clutch rod on the right had collapsed & welded itself back together including welding the thrust bush on the end! You never know when you will need a drift/punch or bit of steel rod so that’s why I kept them.
JD: Chunky, amazing, we will worry about the clutch rods later ok, this is about the engine breathers!
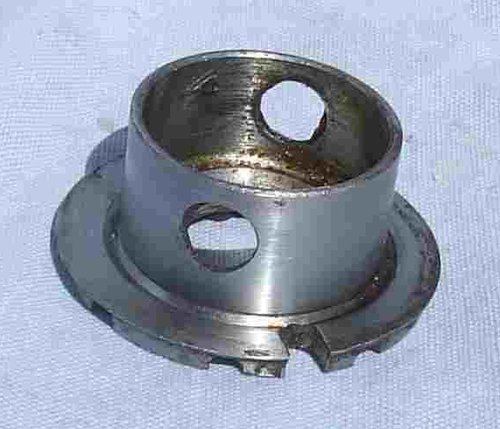
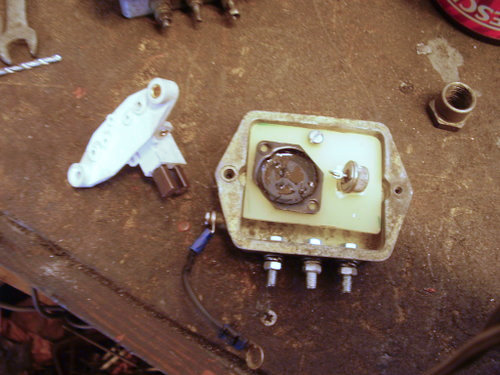
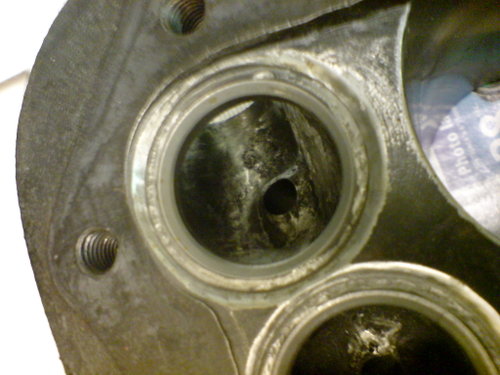
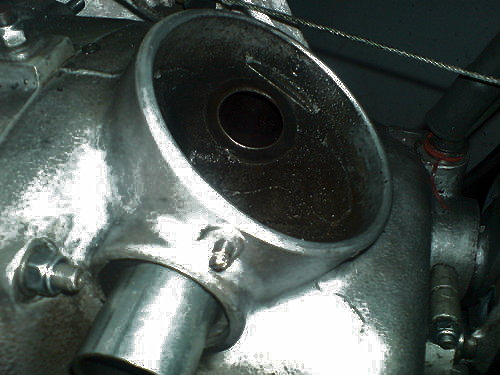
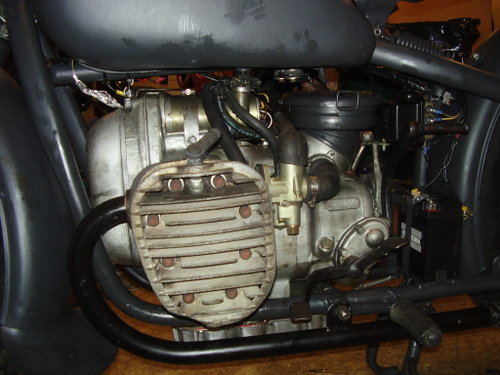
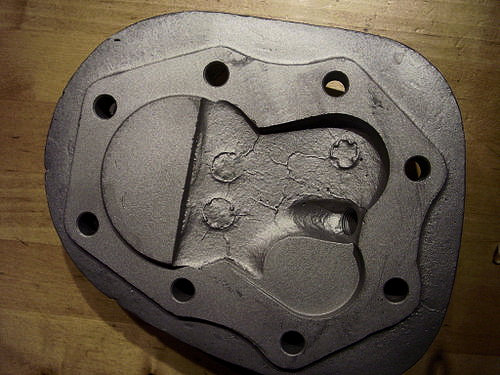
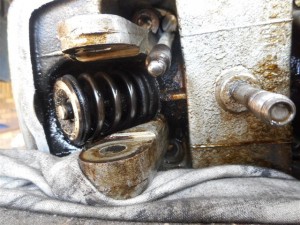
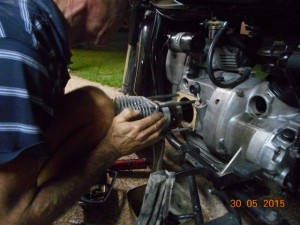
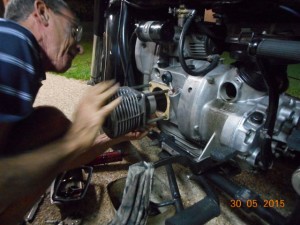
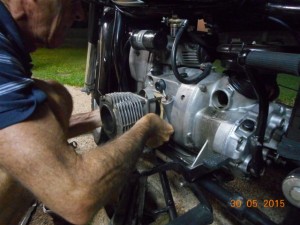
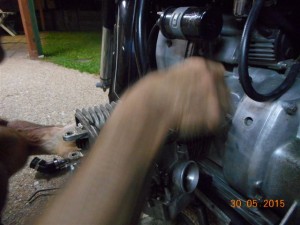
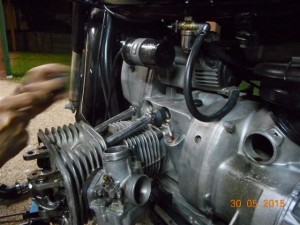
JD: I spoke to Jan on the phone just now and he is going to take some photos of his (1969 Ural OHV M-63). Fascinating! Jan has sent in some photos of his Ural M-63 breather, and trust you Jan, always full of surprises, its different again! Note the cut-out on the side for the locating pin, instead of a hole!
Breather out of Jan’s 1969 Ural M-63
SteveW: Jan’s is upside down compared to the other two.
JD: How convenient Jan was doing an overhaul right now.
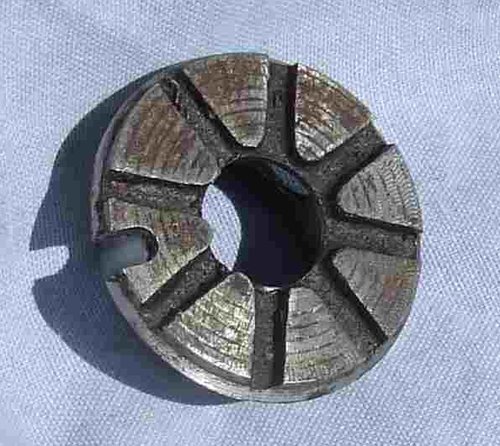
this is Jan’s breather from 1969 Ural M-63 viewed from the top
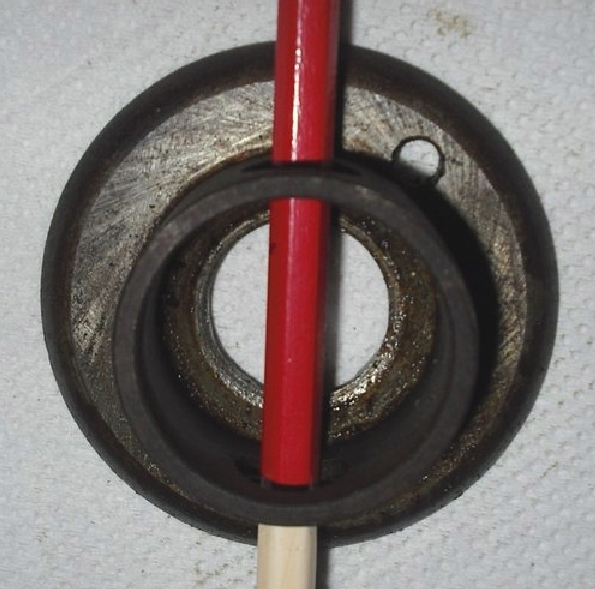
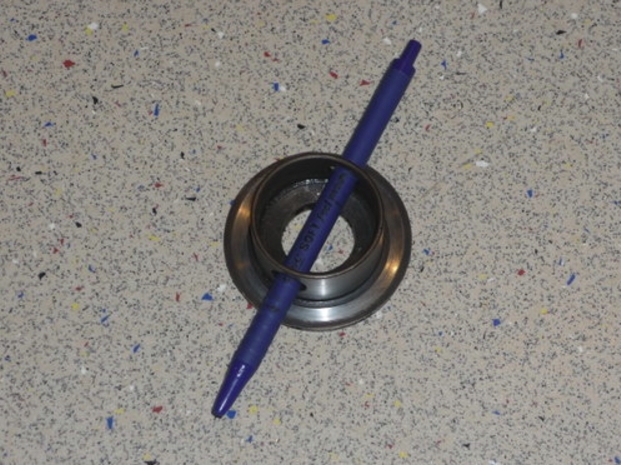
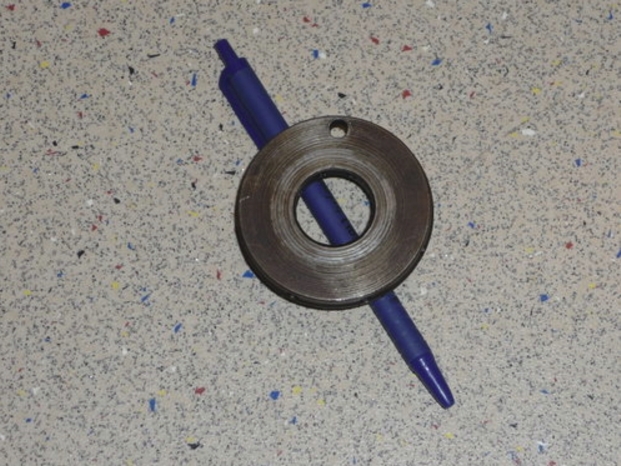
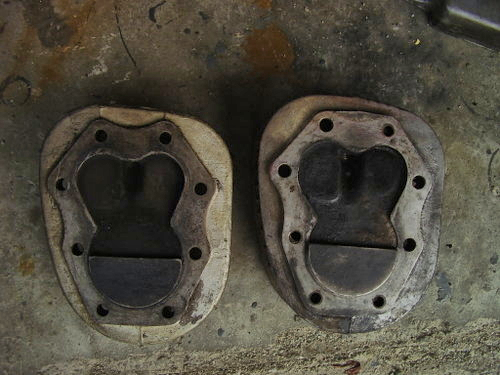
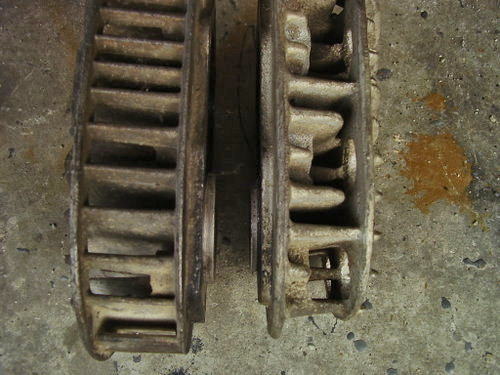
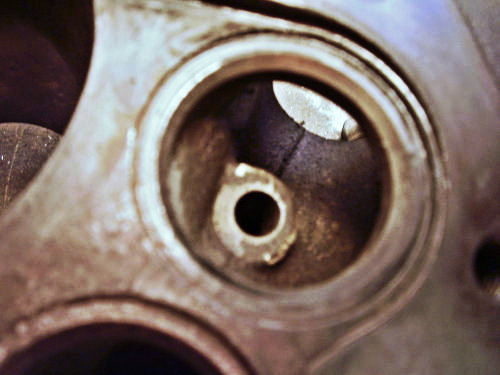
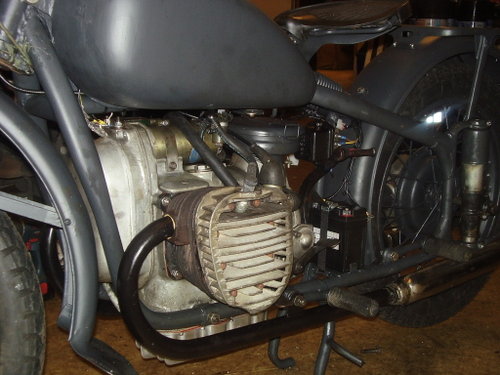
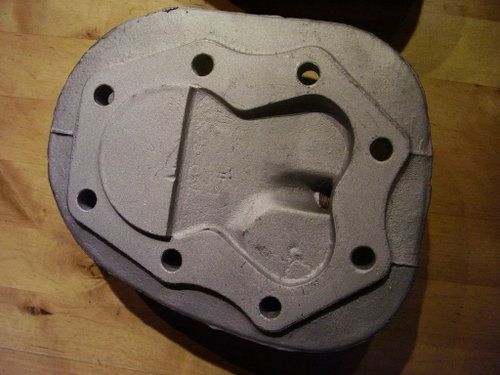
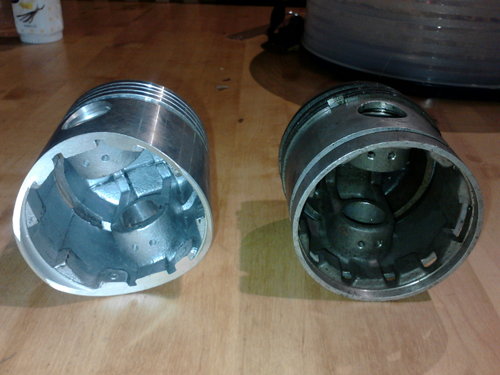
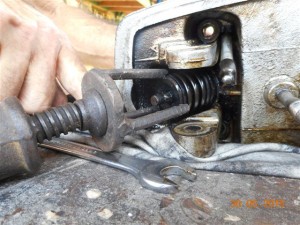
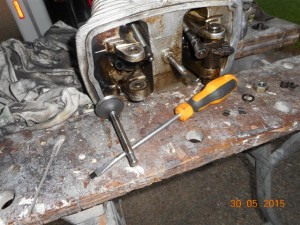
JD: Looking at the breather I have with the red pencil, with the hole on the RIGHT, is 1974 Dnepr OHV MT-9. I’ve just had it sitting there for the past 30 years! But because I also had several Urals and a ton of spares I just wasn’t sure without stripping a motor.
JD: Chunky, I’m sure the one on the left in your photo (which has the hole to the right) is Dnepr 650. You would expect that it WOULD matter, as its the crankcase ventilation timer, and thats an important value you would imagine.
Chunky: I have looked on URAL ZENTRAL ETC & they list two different part numbers for the SV & the OHV but show the same breather in the picture (the one on the left)
Edit by Catwesel 2021, It still is after so many years, very confusing !!
JD: Chunky, where did you get them from?
Chunky: I had the left one that was fitted to one of the MT9 engines I have (I haven’t stripped the other) the right one arrived with some OLD SV bits, I am pretty sure my DNEPR SV 750 has the left one but without stripping I cannot remember (this could have been fitted in error though in the past though!) and I know that if you take the tappet covers off when she is running she really chuffs out of those so she’s got loads of crankcase compression. So the one on the rights a bit of a mystery or its the right one for the the DNEPR SV 750 it differs in the thickness in the ring but has the same outside dimension and that the breather holes are in a different place.
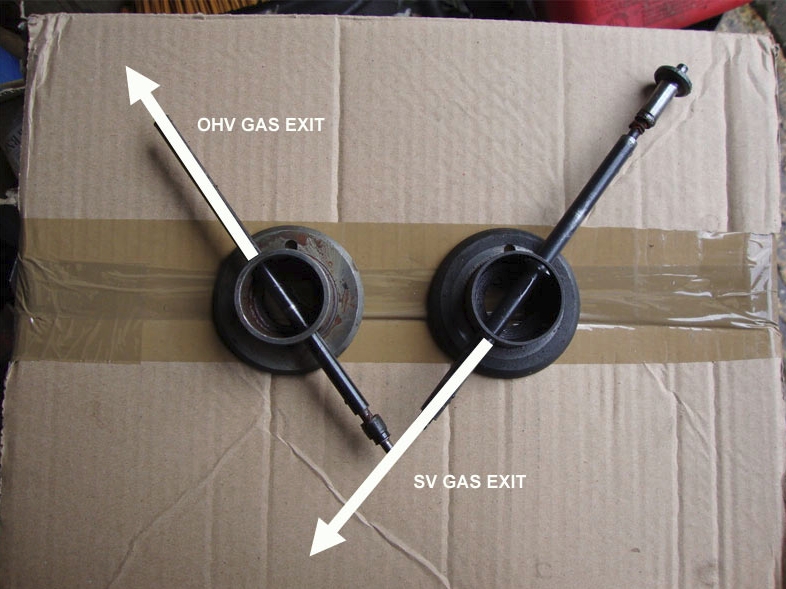
Roma: It is due to the location of the cavity in the front casing that directs the air out of the breather. The 650 OHV has the breather exit near top of engine on left (facing engine from front). The SV engine is lower left (facing engine from front). It would be very bad if swapped. Both have another hole 180 degree out.
directions from air exit
Chunky: Well, I did what I should have done in the first place!, I took the front case off my SV MT12 and I can confirm that mine has the one on the right (although I must admit it got me wondering) so that must be the correct one for the SV DNEPRS at least, don’t know about the m72 or Urals though.
JD: Mr Catweazle or others with early IMZ M72 might be able to share their observations. I’ll ask.
catwesel: Question from a member of the UDCN, I’m not been busy with this subject of debate 🙂 So plz bare with me, I will find the time to look into this ! The question is, are there front plates where the hole is on the other side ? I.E. differences between Ural, Dnepr, Flathead or OHV ? grtz From Cat
®Catweazle sent these photos: Have made an picture from an K750 plate and from one of the M72’s As you can see there’s a difference how the pipe is placed . Don’t know how the inside looks like, and I don’t tear it apart for some pics ! 🙂 Will have a look if I made a pic before I’d put everything together. Have a nice day – Cat
M72
K750, inside timing cover
K750 outside timing cover
Does anybody know something about timing of the breather (releasing the “over” pressure in the engine) Think it should be the moment just before the pistons are in the absolute down position? Or on the way down ? Something to think about ?? 🙂 grtz Cat
JD: Talking to Catweazle about all this I will copy this from my manual for Dnepr K-650/MT-9 which is overhead-valve (OHV) says:
“During engine operation part of the combustion mixture and exhaust gasses break into the crankcase through the gaps in the piston rings. When the pistons move down, the volume of the crankcase diminishes and the pressure inside it grows which may cause oil to squeeze through the oil seals (glands) and through the joints between the crankcase and the covers.
To avoid this the crankcase inner space is connected to the air through a breather fitted in the central hole of timing gear box cover (front engine timing chest). The breather allows to ventilate the crankcase, when the pistons move down and isolate it from the atmosphere when the pistons move up (towards the head).
The gasses which pass from the crankcase through the breather always contain water steam which in cold season may turn into ice and block the breather pipe, thus preventing gas flow from the crankcase, due to which oil will leaks through the seals.”
Cat: Hi all, and special hi for JD. Havin’ problems with Natasha, after a few times runnin’ I noticed she build up pressure! Noticed it after she started whistling besides the generator 🙁 Removed the heads and the valve cover, when the pistons go down/in air blows out the valve compartment !! Hope to check it further this weekend but it must be the breather!! Guess I have the wrong type of breather inside !!!??? Will be continued… grtz Cat
Cat: Sh***TTTTTTTTTTTT, removed the front of the engine, took out the breather………………..it’s a good one !! What the heck is going on ????? Now I have to investigate further what the problem is and what cause this air pressure! Can it be a valve that isn’t closing ?????????? I doubt it, because it’s really a lot of air that is coming out !! will be continued, sigh grtz Cat
front side
Back side
seen from side-way
comment: wojciechnosko (Poland): Roma, You have it right, left is ohv, right is sv, difference is because of different breather hole position in cam shaft cover. Catwesel, checking breather is easy, just see if there are leaks of oil from gasket between engine case and oil pan if so then probably you have wrong breather or drain pipe is stuck, if air blow from air flow pipe during engine work and there is no leaks then I wouldn’t worry about it, it is normal that you can hear air flow from the valve push rods when valve cover is removed and piston move down , so do not be alarmed, as for timing of this valve I have SV engine data here it is, http://wojciechnosko. [now defunct link]on the drawing which I made myself I use polish names translating is GMP is TDC (Top dead center) DMP is BDC otwarcie przed DMP means OPENING BEFORE BDC zamkniecie za DMP means CLOSING AFTER BDC this data is from M-72, only difference between M-72 and other SV Russian engine is diameter size of the valve itself in later version of SV engine such as K-750 MB , or MT-12 diameter of the breather is bigger
comment: wojciechnosko: Answering question of catwesel about position of the hole in valve plate (not in the tube), yes position of this locking pin is same , in Ural I’m not sure where it start, but because lock pin in timing gear was often bent due to pressing in process they start to make this U shaped hole in the flange , I also had this problem with mine breather, all set (gears and valve) was new , but when I assembly front cover (without putting in screws) I noticed that all, breather valve and cover oscillate due to bent lock pin , it took some hours to correct it , but I think cutting U shape would be much faster. So old Ural until I think M-67 have same position of the air flow pipe . Even tho I do not think Ural valve can be used in K-750 or M-72 due to diameter and length which is different. SV engine have all pipes pointing down as well as old Ural, Dniepr looking from front of the motorcycle to the back have air from pipe on the left side of timing shaft on the top of the cover, Ural have on the right side on the top, so position of the holes in the tube have to be different
Aldo in Italy emailed me off list and asked me to post up these 2 drawings:
Hi JD, please post for me these pics and this text in blog “engine breathers which is which”
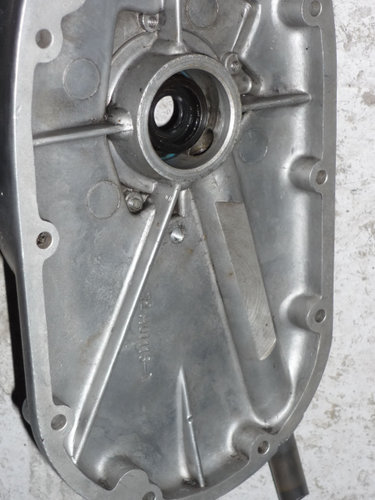
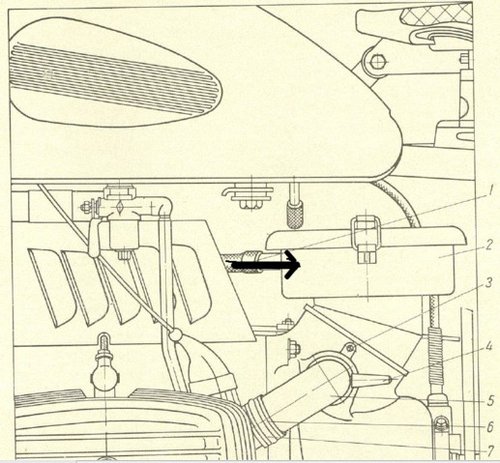
I don’t think it’s for air pressure,because there’s always the “door open” from the inner case to the atmosphere. At least on Dnepr .In the first pic you see the holes circled in red which make one volume of the internal engine together the house of the timing gear and centrifuge. In black you see the real breather that takes out the air. In the second pic the exit door to the atmosphere – Aldo
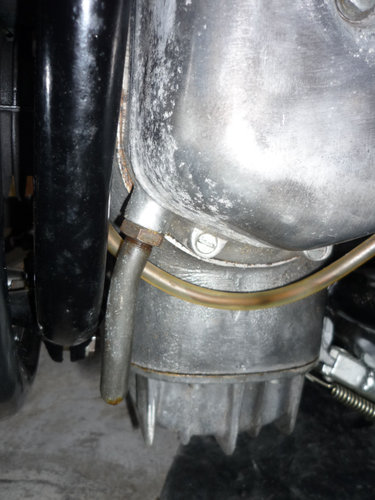
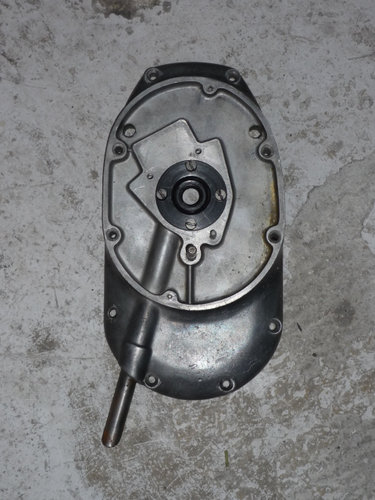
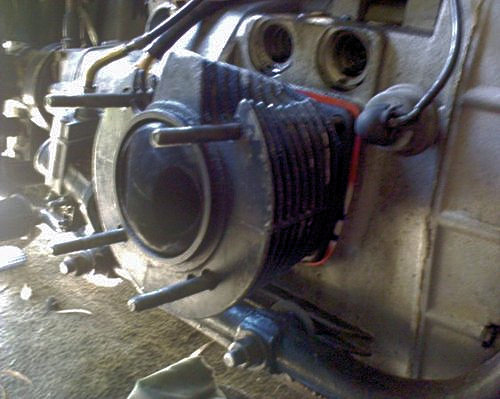
OHV KMZ Dnepr K-650/MT-9 etc breather outlet connects to oil bath in air filter
Aldo! I used this photo of yours! (above) to highlight the location of the breather tube (vent) on Dnepr OHV.
Aldo: And the holes for the mandrel used to take off the front housing (same height of the crankshaft) are the ones that make same the space of the engine and the front cover.
Aldo: Thnks JD ,In my opinion the breather on the camshaft has a different aim. The pressure inside the engine, despite the real breather which goes to the air cleaner (OHV Dnepr), could be high enough to push some oil through the gland that seals the camshaft from the spark distributor.The radial grooves on the rear face of the disk (“breather” on the timing gear) reduce the pressure of the oil mist and allows it to lubricate the hole in which it goes inside. So, grooves, inside the internal cylindrical part of breather , through the “oriented” hole and ends on the surface of the front casing hole where the breather goes in. On Dnepr I guess this is the matter.
Catweazle says he has noticed two types of breathers for the 750 sidevalve?
Difference in diam.
“back side” ie side that is facing towards crankshaft
In retrospect, this must be what Wojciechnosko was telling about, M72, left and the later with bigger diam. on the right for K750MB or MT12.
JD: PS. When I was young and stupid I decided to clean the centrifuge on my Dnepr, shouldn’t have bothered, there was hardly any buildup inside it. BUT… shortly after I had put the front timing chest back on (yes with gasket and glue!) I noticed the engine breather sitting on my shelf! I think I beat a world record, dismantling the front cover, re-installing the engine breather, and the front timing chest cover, before the gasket glue dried. Just to mention, do not get distracted from the job!
So there it is!
Abbreviations used: SV – Side-valve OHV – Overhead-valve TDC – Top dead center BDC – Bottom dead center
retrieved from the archives by JD
Wojciech Nosko Poland! here you were a valued participant years ago, before website crash. We want you to join us again! JD finds you at WRENCH, love your work! How to say hello!
Bill originally commenced this post 11 August 2009 9:52PM by seriousbill (SB) for everyone
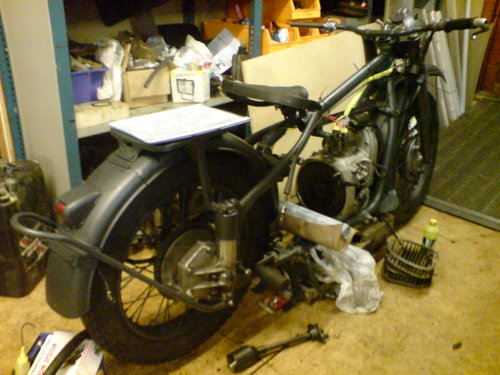
SB: As I’m currently grounded I sold/px’d my K750 project off to a mate so he can get around this summer. I’ve been smitten by the sidevalve bug and I’ve always liked the lines of the CJ and it’s brethren so it was an easy decision. I will put all the stuff I get up to here to keep it all in one place that is easily accessible for those that might find it useful. While on holiday I’ve done a lot of research on the CJ,M72 and BMW R71. This brought up some interesting info that I’d never seen before. For example the BMW R71 used the 3.89-1 Cardan as sidecar gearing and 3.6-1 as solo. That means that 650 Ural should be able to cope with the 3.89-1 gearing with 19″ wheels. Needless to say when I got the chance for an M72 solo Cardan assembly I took it. I also found that the R71 had a single plate clutch. I’m toying with the idea of trying this as the bike will only be used on the road. This will remove a sizeable chunk of rotating mass so the acceleration should be a bit better. While looking at the different M72 specs on the COC site I came across the M72K. This appears to be a hotted up version putting out 27bhp. This appears to have been done by adding a magneto for better sparks and a freer flowing ‘air filter’. The K750 on the other hand got it’s 26bhp by increasing the compression from 5.5/1 to 6/1 and putting a balancer pipe between the exhaust pipes just behind the gearbox. I figure that a flamethrower coil from a Honda Magna and 1mm plug gaps (This worked on my K750, also requires 12v conversion) should match a magneto and the K&N style filter from www.oldtimergarage,szn.pl should do a better job in the flow and filtering departments (also worked of the K750). A couple of K750 heads and a few hours work with the welder should do the rest. I figure this should get me over the 30bhp mark with ease. The motor hasn’t had an easy life so will get a full overhaul to compensate. I’ll go over the bike and also give it a coat of dunkelgrau. The biggest challenge will probably be the brakes and crappy wheel hubs. The electrics are also going to get a good seeing to. Proper earths and decent cable gauges all round along with LEDs, halogen headlight and relay operated dip have worked well on other projects so they will get repeated. I’ve already bought new oversize pistons, PZ28D carbs, taper roller steering bearings and some other goodies. I also bought a couple of good books on tuning Ford Flathead V8s to catch up on the latest sidevalve tuning tricks – the yanks are still doing this would you believe! I already know that the CJ responds very well to opening up the exhaust port and generally cleaning up the ports. I plan to do some work in the chambers to improve gas flow and cooling. The edge of the cylinder closest to the valves always looks overheated on these engines so I plan to put a SMALL radius, about 0.5mm here to take the sharp edge away. This should reduce the heat uptake by the cylinder and also improve the gas flow into and out of the cylinder. All this is good for power and reliability. I’ll sort out photos of the work as I go along.
comments: from martin and trekankalien: There’s a German site “Richard’s Russen” – a lot of nice stuff done on a K750. The following link is for exhaust port and camshaft. Ok -it’s in german, but use google translator if you have trouble with the language (that’s what I do) 🙂 [Note http://k750.myluna.de/ website no longer exists, does anyone know where it’s gone? Ed.]
SB: I also did the maths for cam lift and came up with 9mm as being what I need. I doubt my finances will stretch to a re-ground cam like this guy though. I have a blown K750 crankcase that I’m stripping at the moment as well as a spare CJ M1 bottom end. On friday before going off to our AGM rally here I got a chance to compare the cams. First of all both the K750 and M1 had a base circle diameter of 30mm, The M1 had a lift of a touch over 6mm and the K750 a lift of a touch under 7mm so these correspond roughly with Richards figures. The M1 cam also corresponds to the M72 blueprints we have on this site. I’ve no idea of the duration of either the M1 or the K750 cam yet but from the blueprints I worked out that the M72 cam duration was 273 degrees, overlap was 52 degrees and lobe centre angle was 110 degrees. These figures may be incorrect as the writing on the blueprints is a bit hard to read in places. The sum of all this is that I will be using a K750 cam. At the rally I picked up a couple of K750 heads from my mate Helge. These will be fitted. The combustion chamber cavity volume is smaller over the inlet valve compared to the M1. Also the squish platform that protrudes into the cylinder bore on K750 is 5mm where it can be anything from 4 – 7mm on a Chang Jiang head! I measured 6 of them on Thursday and that was the variation(NOTE – NO IT WASN’T THE VERNIERS CALIPERS WERE GOOSED, there was a 1mm variation). The CJ quality was pretty crap too. Fortunately I had a matched pair with the 4.5mm protrusion. The chamber volume was low on these too so I’ll be comparing these with the K750 heads. The Chang Jiang M1M has a higher compression specified than the M1 so I’m wondering if these are M1M heads. Quality was a lot better too and this matches what I’ve seen with other M1M engines. I suspect the M1M is made with more modern machine tools. The picture on Richards site that shows the porting work is the same as we did on Øyvind’s Chang Jiang here. The bike ran cooler and tackles hills with a bit more alacrity than it did before. Interesting that his power curve shows, at a quick calculation about 37bhp. This is about what I reckon to get out of my project. I wonder what carbs he is using.
comment: Trebankalien: I read that he’s using PZ28D carbs with 115 main jetting. I got myself the reground RGFcam.
SB: How much did the cam cost? I had a really good read of his site when I got back from the docs today (lookin’ good by the way) (And thanks JD it was easy once you know how). I read the bit on his cylinder head and though ‘yes that’s what I mean’. I would actually like to weld up the head a bit to improve the mixture burn and increase the compression but welding is out for the moment. I have got me a little chat with the pacemaker rep on thursday so I’ll get to find out what I can and can’t do straight from the horses mouth. The info on the Renault Fuego pistons is the sort of thing I’ve been looking for. It is relatively easy to get 79mm pistons but getting them that are lighter than standard, have the right compression height and pin diameter is another thing. Richard looks to have got there before me on a lot of things and saved me a lot of time. The ignition article was interesting but I’ll be sticking with my modified Boyer Brandsen system which I think has a more appropriate advance curve. I ordered one of the airfilters he uses while I was on the way past one of the usual suppliers I pester when I have an unknown number. I pick it up tomorrow, bit on the expensive side so we’ll see if it is better than Oldtimer’s one. His comments on Chinese and Russian piston metallurgy were funny – good for cutlery.
comment: Trebankalien: The cam was 112Euro…..reground and hardened. But I’ve had the bike for 11 years, so it’s in the budget. About pistons I saw another german site with thoughts about alternative pistons: [site no longer exists, Ed.] So much nice info around – I really would like to go to the shop.
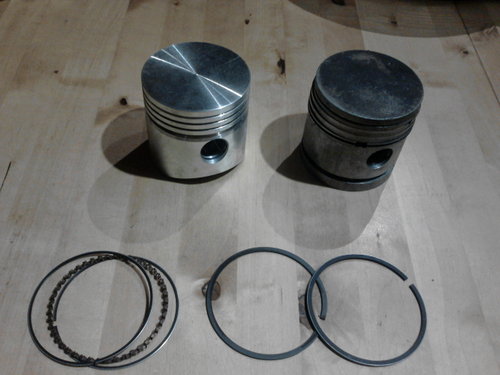
SB: OK, with a little bit of help from JD I’ve got some photos to show. The one above shows the K750 head on the left and Chang Jiang M1 on the right. If you study the M1 head where the valves sit and compare it with the K750 head you should be able to see that the M1 heads is deeper over the inlet valve. What you can’t see on the picture is that the K750 head is generally shallower.
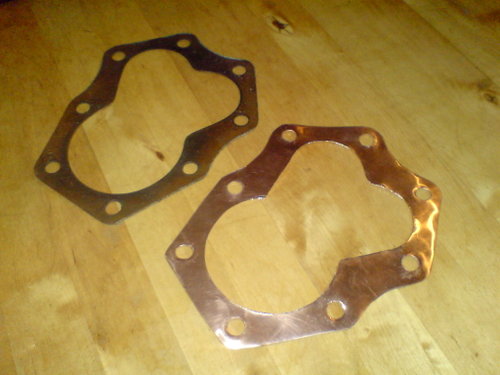
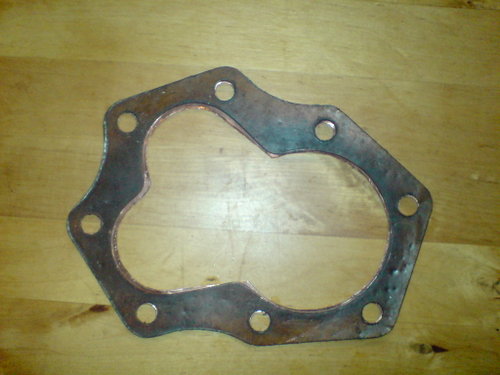
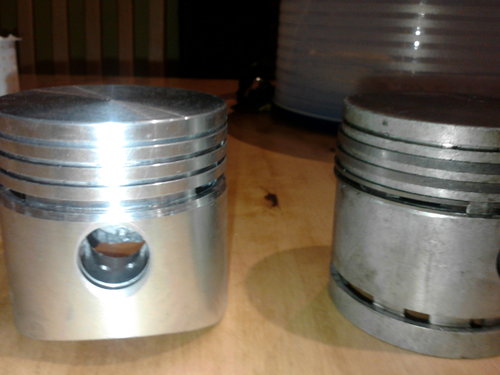
This next photo shows the heads face to face, K750 on the left. The difference in height of the squish tables can easily be seen. The K750 is 5mm high and the M1 is 4.5mm. According to the specs the M1 has a C.R. of 5-5.5/1 and the K750 is 6/1. There are head gaskets available from 1.6mm to 0.5mm. No prizes for guessing which thickness I’ll be using. I bought some 0.5mm copper sheet the other day to have a go at making my own gaskets. All the old gaskets I’ve seen for this engine do not follow the combustion chamber shape very well so I hope to do better. I’ll be aiming for a head to piston clearance of about 1mm so there will no doubt be a couple of dummy builds. I’ve also got three type of base gasket of varying thickness, something one needs to think about if one is refurbishing one side only.
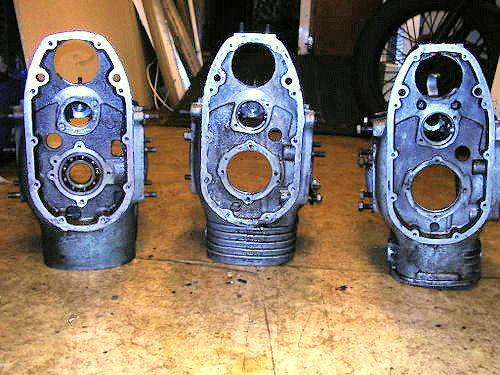
Here’s the next pic’s. These are of the crankcases I have access to. I originally thought I had an M72 case, a K750 case and a Chang Jiang M1. After looking at the comparison in the archives I discovered what we have is early K750 cases instead of the M72 cases.
The cases on the left are CJ M1, middle late K750 and right early K750. The things to note are the larger holes in the timing case on the Chang Jiang. This is probably to help reduce the pumping loses by increasing the internal volume that can be compressed when the pistons travel to BDC. Another thing to note is the front main bearing area. The M1 does not have the steel cup insert that the K750 has. Everybody down our club who saw the cases together were in agreement over the casting quality. The Chang Jiang casting was visibly better!
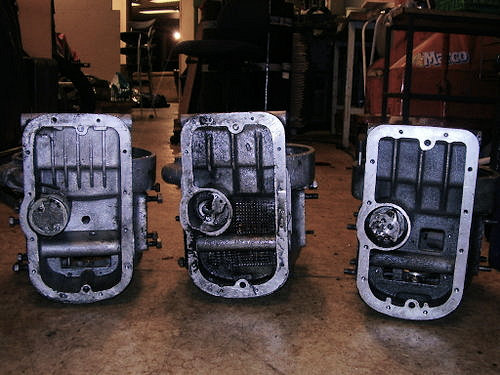
This picture shows that the M1 case on the right is the same from the sump side as the late K750. It even has the gratings although they aren’t fitted in the picture.
The M1 case is on the left of this pic. The thing to note here is the dipstick hole. Much higher than the M72,K750 or even the Ural 650 which is closely related to these engines. The oil pump was the same as the M72 and K750. The Ural 650 pump bolts straight in and is about a third more in capacity. I’ve ordered a high capacity pump from MHmetalheart on EBay so I’ll be interested in making the comparison here.
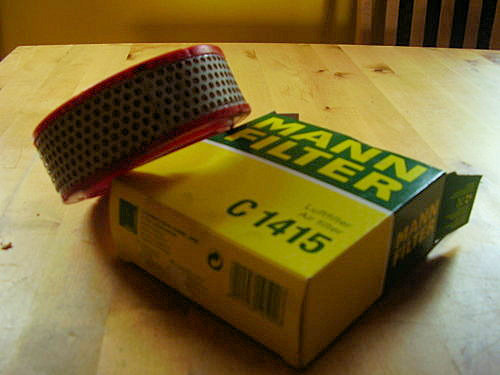
Here is the Mann filter I ordered after getting the number from Richard’s site. It was easy to get but bloody expensive. 368 Norwegian Crowns for a paper filter! That’s almost forty quid!!! I’ll be buying one from Oldtimer when he gets back from his holidays. His are washable. I’ll also order a set of ‘improved’ valves to go on the exhaust side. The standard valves are the same for exhaust and inlet and are magnetic. That means they are not austenitic stainless steel that are best for the exhaust valves.
comment: Trebankalien: Nice work SB!! Keep us informed. Interesting that the chinese metalwork was better quality – I’m about to buy new valve tappets for my K750 and saw that boxermotor had both russian ones and chinese ones, but quite a difference in price. Has anybody any experience with the different ones they would like to share?
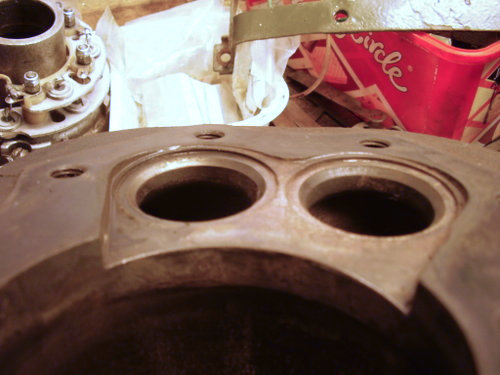
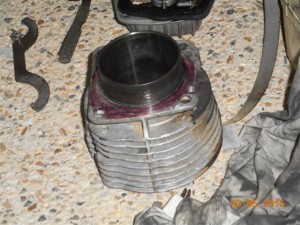
Time for an update. I managed some time in the garage today so I got started on the cylinder heads. I’d already butchered some old valves to protect the valve seats so that I can do some grinding in the combustion chamber without damaging the valve seat. Here’s what they look like:
If you look closely at the valve on the left you will see the margin has been ground off to allow me to get in at the area round the seat. In this next pic you can see why I did this
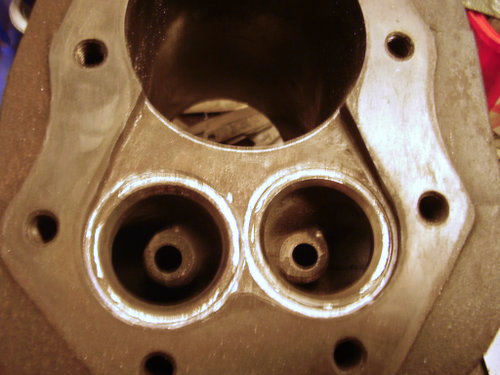
You can see the sharp edge that goes round the valve seat insert. This will disturb the gas flow into the cylinder. The edge of the cylinder in the combustion chamber will also be rounded off. As well as disturbing the gas flow sharp edges absorb a lot of heat into the cylinder. This is because they have a large surface area in relation to there volume. I figure that if I round this edge off then the cylinder should be a little cooler. When de-coked the chamber the deposits in this area were hard and the same colour as the exhaust valve deposits so it is probably getting up to a similar temperature. The new mixture coming into the cylinder will hopefully not get heated up so much by the chamber and so not expand so much. According to my theory that should allow more fresh mixture into the chamber. Here are the end results.
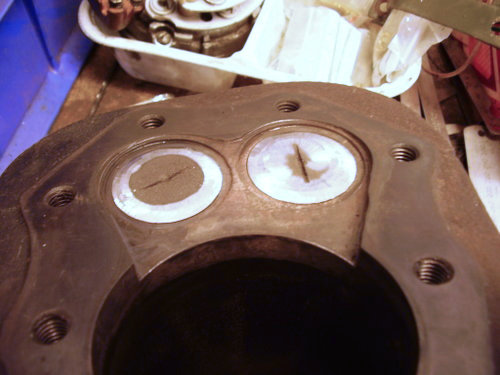
Doesn’t look much but all the books say it should make a difference. Here’s a pic of the valve blanks in place.
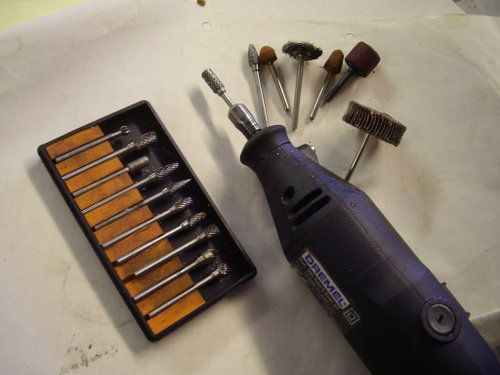
I used a Dremel and bits to carry out the work. Don’t know what I’d do without this this thing.
The next job is to remove most of the valve guides and smooth out the ports. This is a lot of work but works well. We have already done this on a mate’s CJ.
INLET PORT
EXHAUST PORT
I spent a good 3 hours grinding that lot out and smoothing out the ports. Shape is more important than finish but I still have some final smoothing to do. I also polished the valves and removed there sharp edges when I had a spare half hour yesterday. This evening I had a check through the stuff that came with the bike and found out that there is a crank less than a complete spare motor. I wonder if I can stretch the finances to a new crank?
comment: catwesel: Nice work mate, I’m not much on the net but I will try to follow your escapades 🙂 About the airfilter I did find some other ones you could use ! Mann filter expensive ! Atlas Copco 1503 0189 00 cheaper !! see you suc6 Cat
SB: OK, Time for another update. I’ve ordered a selection of ‘good stuff’, some of which has arrived. here’s a short summary.
Good oil rings from F2 Motorcycles A pair or ‘Unleaded’ valves from Oldtimergarage to go on the exhaust side. An air filter element from Oldtimergarage High flow oil filter from MH metalheart A deep sump from from Russia – more about this later! Solo gearing 9/35 from MH metalheart K750 dip/horn/advance gear – ‘cos’ the CJ ones are UGLY Taper roller steering bearings
Plus other sundries. I didn’t mean to order a deep sump as I don’t agree with them but that’s what arrived! Oh well Øyvind hasn’t had any problems with his so on it will go. Fortunately it is a Russian one with two ribs inside and a check pattern in the casting. These will act like fins inside the sump, hopefully. I plan to glue some small neodym magnets in the floor of the sump to collect any ferrous particles. I had good results with this on my Triton.
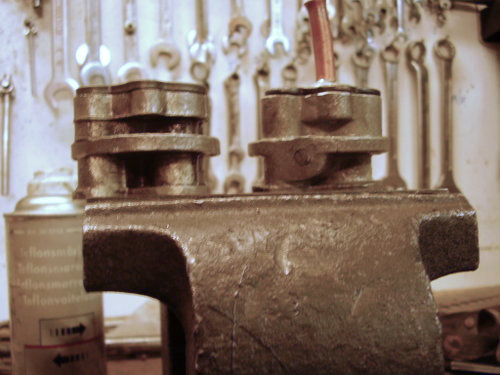
The high flow oil pump was a bit of a shock. The gears are about 2 3/4 thicker than the standard pump!
Interestingly enough, the pumps are the same external dimensions
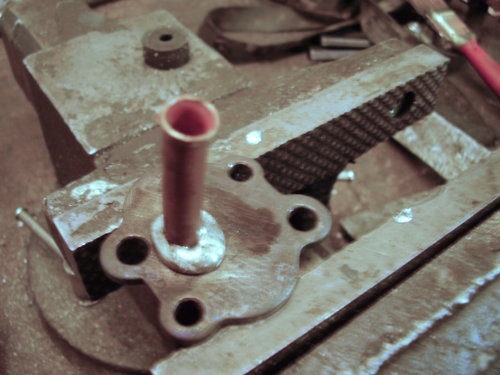
I will measure the diameter of all the oil spray holes have AT LEAST the same area as the main oil gallery, a little bit more is desirable to cater for viscous drag in the small drilling’s. This thing will allow me to try an experiment I talked about on Russian Iron. I plan to run a synthetic 5w30 oil. This should reduce any power loss from the larger pump and make it easier to splash the oil about. I remember reading somewhere that rolling bearing prefer a thin oil too. Using thin oil means the oil will find it’s way out easier so I’ll have to be extra careful with the assembly. Valve guide seals will also be a good idea. The first thing I did with the pump after pulling it to bits and giving it the once over was to make an extended pick up to make use of the deep sump. There isn’t any point in having one If I can’t use the capacity plus an extended pick up will reach the cooler oil near the sump base.
Don’t waste any time criticizing the soldering! It’s good and strong and I couldn’t break it off!
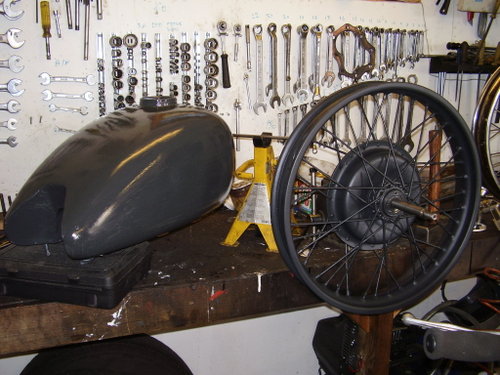
I’ve also got hold of some ‘Svartgrau’ (RAL7021) paint and started tarting the bike up a bit. The spare CJ wheels I got with the K750 I have overhauled and trued up, not as bad as Russian wheels.
The back wheel in the picture gives a truer impression of the colour. The whole bike has been washed down but I haven’t got round to pressure washing and rubbing it down yet.
Another thing I’ve been doing is making up a home designed 12v regulator using parts from a Bosch alternator. I’ve done this before but not with these parts – should be interesting! I fitted it all in an old PP302 case so it doesn’t look out of place. My mate Øyvind had a problem with the distributor on saturday and appears to be coming round to my view that it is a more trouble than it’s worth and a 12v conversion with a double lead coil might be the way to go so it looks like I’m going to have to make another one.
SB: Here is this weeks update. [Sept 2009]
Mostly it has been plain hard work and painting. I trued up 6 wheels for me and my mate as well as 2 painted. The frame got stripped and painted along with sundry Items. It will get a second coat tomorrow. I brush paint these days. Because my bikes are ridden through the whole year corrosion resistance is more important than looks and I find a brush easier to get into all the nooks and crannies. I’ve had so much practice that I can get a decent finish now too.
I had originally only planned to blow over the frame with a spray gun after flatting everything down but it actually looked as though it would be easier to get everything coated by using a brush.
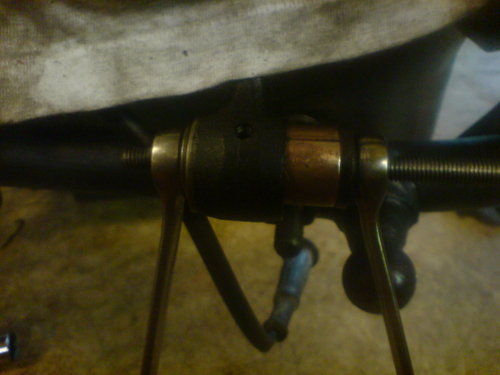
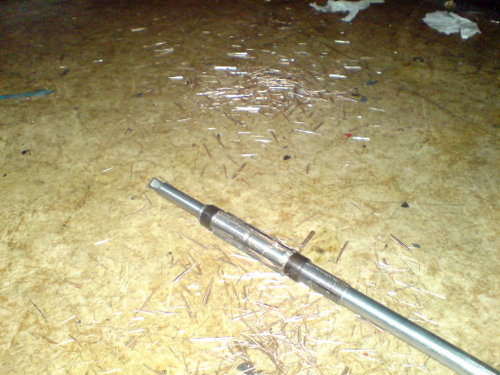
I also managed to get the solo final drive gears fitted after the wife got a visit from a friend on friday night. This gave me a chance to measure up the plunger bushes. Catweazle’s list says they are 25mm internal diameter x 28mm outside diameter x38mm length. I couldn’t get a good measurement of the length but mine appear to be a bit shorter. To get the bushes out I’m going to have to get a 26mm or 27mm tap, tap it into the bush and then use a brass drift to knock the whole lot out. I checked my bearing catalogue and found out that there are standard size bushes 25mm x 28mm x 35mm length so I’ll be using these. If the original bush IS longer then I doubt it will matter too much. I may even try a PTFE impregnated bush. The plunger shaft was unworn and in excellent condition. Somebody in the dim and distant past has really gone to town with a grease gun so I’ve been lucky here.
Maybe I’ll get round to a blog on this project too.
comment: JD: Your’e doing great work SB and thanks for sharing it all with us here. Brush painting can be better than spraying as you say gets in everywhere nicely. I learnt to paint starting at the edges and working to the middle with a five-pointed-star method with the brush at about 30-45 degrees. That last stroke is the most important. Mr Gautrek posted about his front brake way back on our old MSN Group. He joined us here when we moved to Multiply but always kept complaining the site was BROKEN, that he just couldn’t work out how to post here like you have, so he started his own forum, which is a pity as we miss him here. Funny thing was he was actually posting to the site. Go figure.
SB: Quick progress rapport. Dismantled and overhauled the forks today. I was a bit worried as this appears to be an ex-PLA bike and the forks were allegedly locked solid. I needn’t have worried as everything was in good nick apart from a little surface rust on the fork legs. The bushes weren’t even worn. When I started re-assembly I fitted taper roller steering bearings. The frame needed a little work with a Dremel to remove some lumps so they would seat right. The reason the front end was solid? Engine oil in the forks. I’ll be using 10sae fork oil.
I discovered an email from Oldtimergarage I’d somehow missed on how I pay for the bits I ordered. Hmm, better get the cash on the way pronto as the Exhaust valves are what’s holding the engine up now. I’ve also started a little mod for the high/low beam switch. I’m using one with a combined advance unit from a K750. I’m going to use a little toggle switch to operate relays for high/low and I might use the Advance lever to operate a light switch in the headlamp. I’m going to be using Boyer ignition so the advance level will otherwise be redundant.
That will be it for a few days while I try to get my life in order again. The docs are happy so far with the ticker but I’ve found out that the box they fitted me with is really sensitive to magnetic fields which can throw it all sorts of wobblies. That means my job as an ROV pilot has gone down the pan and I have to find a new career! Oh well, I’ve always wanted to be an archaeologist, Now might be the time.
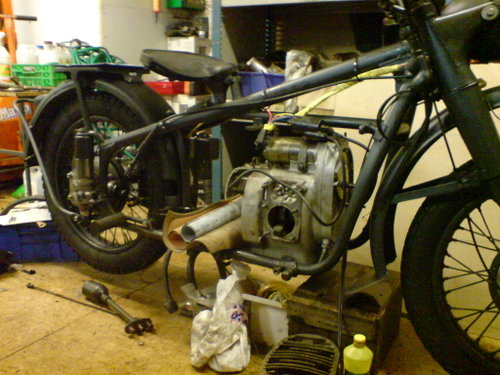
SB: Gearbox pulled to bits, as soon as I opened it and drained all the water ran out, lots of it. All in al it was in good condition apart from the bearings being goosed so I need to get new ones tomorrow and rebuild it. The thread on the output shaft is a bit iffy but looks recoverable, I hope so anyway or I”l have to repeat the whole process on the spare box that came with the bike. The engine I dismantled and checked over. The discs on the crank were almost filled with hard metallic powder, they work amazingly well as filters really. The little end bearings have rotated and were loose in the rods so they will need replacing but apart from that I replaced the bearings and stuck it back together as far as possible. I even slotted it back in the frame just so I could see a little progress.
I managed, eventually, to get the bushes out of the plunger units. I had to used the Dremel to make a groove up the length of the bush to weaken it and borrowed an expanding bearing extractor to grip the bearing so I could drift it out. I then discovered that I’d measured them wrong and that they are in fact 35mm long. I’m off to Scotland of Friday to visit my old mates and family so I’m going to try and get the rolling chassis complete in it’s major parts- I’ll try and get some interesting pics sorted out. Last Thursday I put the cylinders in to the engineers to get the valve seats re-cut. The piston rings have been fitted. The top oil rings are fancy three part rings from F2 Motorcycles to help keep the oil consumption down and the carbon built up under control. I’d planned to have the engineer fit valve seals but he has advised against it as he suspects there will not be enough oil to keep them lubricated and this may cause sticking. I will however fit 9mm O-rings to the shafts as we have used this on my mate Øyvind’s bike without problems. This halved the oil consumption.
It’s nice to actually se a little progress now. Once the bike is together I can then go and play with the sidecar.
comment: catwesel: Good work mate! About the plunger bushes, the original M72 where about 38-40 mm in lenght, so I let them made this way ! Later on I’d found out that there are stock bushes in 35mm length and a lot cheaper, so guess what I bought for the other bike 🙂 Will change that on the list! grtz Cat
comment: trekankalien: Impressive speed in this project!! I’m following your progress. Thumb-up!
SB: Thanks folks. Yeah, I want this thing ready for the road for when the county doc decides to give me my license back. Got the bushes and bearings today. I had to cycle a few miles out to the suppliers and got a puncture about 3/4 of the way out. I’m begining to get a little impatient with the bureaucrats. The bushes on the un-driven side are fitted. I had to heat the aluminium casting with a heat gun and use a home made fitting tool (a long bolt, nut and two large washers) to get them in. Tomorrow morning I’ll cycle down the club and fit the final drive. If all goes well I might get the box back together. I might even remember the bloody camera. At the same time as doing this project I’ve also managed to progress my MT16 project. It’s getting close to the point where I’m going to have four roadworthy outfits! My wife’s Ural is up for sale so that should reduce the workload plus I think I’ll be selling the MT11 in the spring. Unless I find a cheap barn to rent out of course.
Managed to get down the club for an hour and a half today, I’d forgotten that I had to take my youngest son to the dentist for a check up so I didn’t get as much as planned. I did manage to get the plunger suspension refitted and the back wheel mounted. One bit of bad news was that the back tyre was low on pressure so I may have a slow puncture. Anyway, here are some snaps from my mobile phone. Bit crappy but you will see a bit of progress.
comment: JD: looking good Bill!
SB: Thanks JD, I’m back from my trip over to Scotland to visit family and friends. Very pleasant, renewed a lot of old frienships so hopefully I’ll get some visitors next year. I got a little bit more done on the bike before going as you can see here.
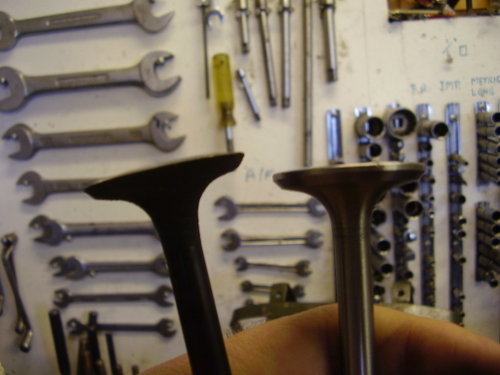
I also got the new ‘Unleaded Valves’ from Leszek at Oldtimergarage. They were magnetic so are not true stainless which was a bit of a disappointment but if they are meant for unleaded then they should be good. I’ll obviously hold everybody updated as to how good they are. The cylinders are back from the engineers where the valves were re-cut. There are some worrying lines on the valve seats that could be flaws in the valve seat metal or micro cracks. They pass the pressure test so I’ll give them a whirl. If anybody knows of a source for new seat then I’m all ears! Anyway, here is a pic of the new valves.
The Oldtimer valve is on the right, original on the left for comparison. As you can see they are re-machined from another application.
Here is a pic of the ports after re-working. I’ve not gone crazy and the finish is not up to F1 standards. As they won’t be going on an F1 car that should be OK.
I have to order some gudgeon pin bushes today so I suppose their arrival will hold up the engine build. That probably won’t matter as my wife has informed me that the mother and father-in-law will be visiting next week. Oh well…….
An now for the good news…… the Doc has decided that I can get my licence back! Yipeeeeeee. That means I’ll be out on the Dnepr next week.
SB: This is going to be a bit short as I’m now having to use a bit more time on sorting out my future rather than farting about in the garage! I am now OFFICIALLY a land crab so I have to find a new job and /or go back to school. I always wanted to be an archaeologist so I might give that a go. I already have the hat, brown leather jacket and Dnepr…………
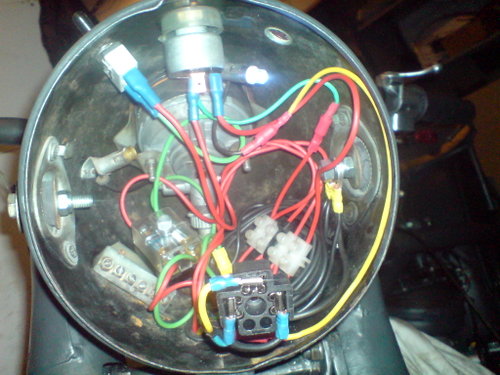
Anyway. I’m nearly finished the wiring. As I’ve converted to 12v, fitted electronic ignition and am using relays for dip and main beam this is taking a bit longer than expected. I’m also going to fit a marine quality ignition switch so sus’ing out how to wire things up took a little time. Hopefully the wiring will be finished by the weekend. The bike looks a tangle of multi-coloured spaghetti so no photos.
I also had a vanity attack and went round changing the 6mm bolts I’d used on the mudguards out for pan head screws. They look more ‘right’ for some reason. As I go more for practicality than looks it must have looked really wrong to everybody else. One small hiccup I had was a stripped thread on one of the handlebar risers. That meant I had to strip them and fit the old risers from my Dnepr MT11. I also wired a small switch into the K750 switch gear I’m using. This will be usef to operate the dip/main relays. I had to hollow it out a bit with the Dremel to get everything in and the switch will be cast in place with epoxy. The plan is that everything will be invisible from the outside once it is all assembled. It will also be WATERPROOF!
comment: drmudplugger Oct 2009: Good looking project – would love to hear how it drives when you are finished. Phil Irving’s “Tuning for Speed” has a section dealing with side valve tuning. He also talks about the speed tuners got out of flat head Harley’s – it’s worth a read – mind you anything written by P.E. Irving is worth a read.
SB: I’ll do a test ride report too. As you say, anything by Mr Irving is worth a read and I’ve already had a look at Tuning For Speed. These days I try to find stuff by Dr. Gordon Blair. This man is a true genius and was responsible for most of Yamaha’s innovations in the early 1980’s. I dug up some stuff done on his software for sidevalves but I daren’t post it as it is copyrighted. Anyway, it shows what appears to be a Honda industrial motor and has a very compact combustion chamber.
Try this link for some really good stuff. This may stink of ‘book learning’ to some. That’s because it is. Backed up with lot’s of experimenting and practical work by people who have far more intelligence, far more money, far more time and above all far more patience that any of us are ever likely to get the chance of. If you don’t understand it then what everybody told you at school was right – you should have done your sums! I just wish I could afford the software, should have taken business studies and may’be I would have.
comment: JD: trivia: Legend has it that Irving accidentally put a side-view tracing of the Vincent 500 motor wrong way up on top of an equally sized drawing of the same view of the same motor, and saw, moving the tracing so the crankshafts and idler gears coincided, that the result looked like a possible design for a V-twin. This resulted in the 47.5° V twin Vincent which appeared in 1936.
back to side-valves…
SB: Yeah, I’ve heard that too. Mr Irving was such a smart cookie that I doubt he needed more than a quick glance at the drawings to see the possibilities.
This weeks update:
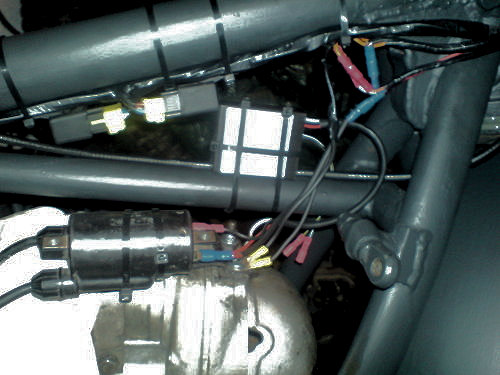
Everything fitted in without a squash although I had to hunt around for a short H4 plug that didn’t get too close to the speedometer housing. Here’s a pic of the Boyer Bransden ignition box and lighting relays in place in a nice sheltered place between the tank halves.
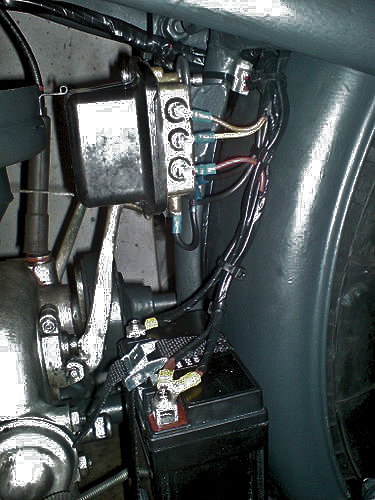
The coil isn’t mounted yet but that is where it will be sitting. Out in the cool breaze where it won’t overheat. I’ve had this problem with two coils mounted in the front of the engine. The overheating may have been caused by the coils being bolted directly to the crankcase. I MAY try fitting the coil in the casing in the front of the engine but insulated from the casing, we’ll see. Here’s a pic of around the battery area.
I would like the wiring to have been a bit tidier than it is but as there are extra wires for the lighting and extra earths then there are several more wires than there used to be. I managed to find a 7amp battery that fitted in the original hole without any trouble. 7amps should be adequate. Too big a battery needs more current to keep it charged. As I’m using a home made 12v conversion without current limiting I have to do everything I can to make sure the dynamo doesn’t get fried.
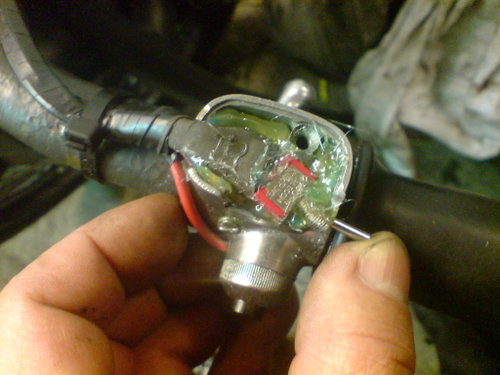
Here is a pic of my Dip/Main switch before final assembly.
And here is everything glued in place before fitting the metal cover. I used a hot glue gun to stick everything together. These look to be very handy little devices. I even managed to use it to build up the switch toggle so that it is easier to operate with my thumb. The glue gets hot enough to hurt and stringy enough to make Spider Man jealous but with a bit of practice and a bit of spit on the fingers things went well. I have different coloured glue sticks so I used black so that it doesn’t look out of place. After a bit of messing about I realised that this may be the ideal thing to make some waterproof covers for where the throttle cables go into the top of the carbs or the speedo cable goes into the gearbox. It may even be possible to cast small plastic parts using it.
This week I hope to do the ignition system and construct a splitter type throttle cable. I also have to get round to ordering gudgeon pin bushes – then I can finish the engine.
comment: JD: Going well Bill. I like your micro dip switch using the original housing. With my clumsy thumb I’d probably have to put a rubber insert over it to make it a bit bigger. I used some stuff in a spray can called Ignition Sealant on all my terminals about 20 years ago and they’re still sealed. Its clear and hard to see its even on there, dont know if its still on the market as I havent needed it. For the battery terminals I use Corrode Cure, a dark murky paste that prevents oxidation, good stuff, one jar lasts a lifetime 🙂
commment: trebankalien: You are doing a real nice work- no doubt! Thanks for sharing!!
SB: Yes JD I have short fat fingers. I will get a pic of the extended switch. It’s not looking too good for working on the CJ this week. I need to do some maintenance on my MT11 ‘cos’ she is a bit difficult to start. The timing needs advancing back to it’s original setting (experimenting again) and a little fine adjustment of the carbs required. I also have taper roller head bearings to fit and the electric foot to refit. On top of this winter is FAST approaching here so I really need to get the MT16 project finished. And to really put the heat on I also have a hydraulic drum project on the go and all my mates are excited to see how this is going to work out. It’s club night tomorrow night so I’ll doubtless get a bit of time.
Thanks for the complement Alien, I have to admit that the links you sent earlier have made things a bit easier. One thing I have done that Richard hasn’t is that I have removed the strangler choke from the gearbox. If you do this on a 650 Ural it makes a huge difference. I’ve discovered that a friend of mine who works at a local bike shop has a dynamometer there so I’m going to see if it will take the M1 and if I can get a discount. Won’t that be fun?!
comment: drmudplugger: Bill, thanks for the link to Gordon Blair’s info I’ll have to download the articles when I’m on a faster link. The name “rang a bell” – he was the guy that helped Greeves with the 380cc QUB (Queen’s University Belfast) Griffon engine a squillion years ago – late 60’s early 70’s. I was reading the mod’s you did to the K68 carbs – do you still think the chinese carbs are a better unit as I was starting to look for replacement carbs?
comment: richardrussen: hi bill, the strangler choke is removed in my gear box hole (cuttet). what you say about my new project “charlotte”? so long, Richard http://k750.myluna.de (website no longer active, Ed.)
SB: Thanks Richard. That’s good to know. I’ve found out that a friend has access to a dyno bench so I hope to get a chance to see what sort of power I get out at the end of the day. What exhaust system are you using? I’ve seen two different types. One with a balance pipe behind the gearbox and one without. The balance pipe makes a noticable difference on my OHV bike so I was wondering if anybody had tried a back to back test on the sidevalvers?
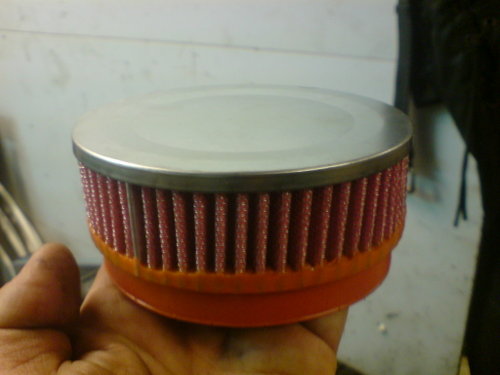
Once again I didn’t get much done this week. Nursing two sick little boys and job hunting take time. I HAVE finally got the airbox modified and the Oldtimergarage filter fitted. Here are the pics.
This one shows the inside of the box after the internal ring has been cut down. I used a pair of pliers to fatigue bits off then tidied it up with a Dremel.
This pic shows the filter in place.
And here is one of the filter before fitting.
Here is what the gearbox looks like with the strangler choke removed. In the future I plan on sorting out some way of reducing the entry to improve the gas flow a bit.
I have also started making up a metal gauze filter to go over the extended intake pipe for the oil pump. As soon as that is done the pump and sump will be fitted. I’m still waiting on the piston pin bushes from F2. As soon as they arrive I’ll take an afternoon down the club and get the engine finished. Then ti’s on to the sidecar….
SB: OK Richard I’ve just looked at Charlotte, not really into Harley clones but that one looks very nice. Clean, flowing lines. Something not people manage to achieve.
One thing I have to know is where you got the spokes to fit the 16 inch rims? And just as important, how much they costed. I’ve got an MT16 project that is nearly finished that is more off-road orientated. 16 inch wheel would mean I might be able to fit car type tyres with a more versatile tread pattern and probably a more wear resistant one too.
comment: trenamkalien: Goood Luck with the dyno bench!! Wish I could hear the sound all the way to south Sweden 🙂
comment: richardrussen: Bill, before you try the dyno, drive the engine min 500 km for best compression. use SAE HD 50 Engine Oil and change this every 1500 km. my engine has now running 32.000 km. the power has fallen to 23 kw. but this is normally. a crankshaft has a life time of normally 20.000-30.000 km, but my crankshaft is almost like new (originally CJ750 OHV for SV twistet crankshaft).
the 16 inch rims i have own fitted. i calculate the spokes (specially for off-center spokes to get space between tire and prop shaft). the rim is a standard Harley 3×16″ 40 hole. To spoke-in this rim with dnepr full hub use following spoke-lengths
30 x L= 72 mm, D = 5 mm (M5), 90°, VA Steel 10 x L = 80 mm, D = 5 mm (M5), 90°, VA Steel
the longer spokes must fit in the outer side of the brake-side of hub. But i have 4 dnepr hubs tested, all was different! check out before spoke-in completely.
good luck for you and your engine! a sorry for my English, I have learned Russian in the school 🙂 Richard
SB: Thanks again Richard. The spoke info I will keep noted down.
I am a big fan of synthetic oil so the bike will be running on 5w50 fullysynthetic but run in on 10w40 semi synthetic. Today I managed to fit the new piston pin bushes and ream one out. I’ve still got about 0.2mm on the second but a telephone call from my eldest torpedoed any further work today – poor wee man was sent home from school with ear ache. It will be at least Thursday before I can get back to it.
SB: The little end bushes finally arrived so I fitted them and reamed them as soon as I could. It is a pig of a job if you use Ural bushes. You have to take about 1mm off the bore a fraction at a time. The Soviet bushes are also rolled from flat sheet rather than made from tube. This can make it difficult to get the hole straight, as I found out. Chang Jiang bushes are a lot closer to the correct size so only need a fraction of a millimeter removed. Easier to do and easier to keep accurate. Guess what I’ll be using next time? Here’s a pic of the little tool I cobbled together to fit the new bushes:
And here is a wee one of all the swarf and my expanding reamer just so you know what to expect:
Now that’s done I’ve got the cylinder on and Boyer Brandsen igniton fitted and roughly timed. No photos of this yet as I didn’t have the time. Over the weekend I managed to make up a couple of head gaskets in 0.5mm copper. I made my own so as to be sure that they follow the combustion chamber and cylinder edges more closely. The gaskets you buy don’t come even close! I wanted a good alignment for two reasons. The first being that I am trying to get all the compression I can so filling in the gap that the standard gasket leaves between the head and cylinder will make a useful gain here, especially as I’m using a 0.5mm thick gasket instead of one that has a compressed thickness on 1.2mm. The other reason I want rid of the small gaps is that any mixture trapped there will tend not to burn well due to it being surrounded by the relatively cool head and cylinder.
I may also whip the cylinders off again and take out the base gaskets. If I can seal the joint with some carefully applied high temperature silicon sealant I can get another 0.4mm compression. Doing all this should remove a total of about 1.1mm of the cylinder height and a rough guess says the compression ratio should get over 7/1, wowee!
I used a good pair of scissors, tin snips and hole punches to make the gasket and used a Dremel with a rotary burr to CAREFULLY finish it. I will also anneal it by heating it to cherry red and dropping it into a bucket of water. Annealing softens the copper. The whole job took about an hour to make two.
Here is a shot of a finished gasket beside an old one
This shot shows the new gasket under a used one. You can get an idea of how far out the standard gasket profile is from this.
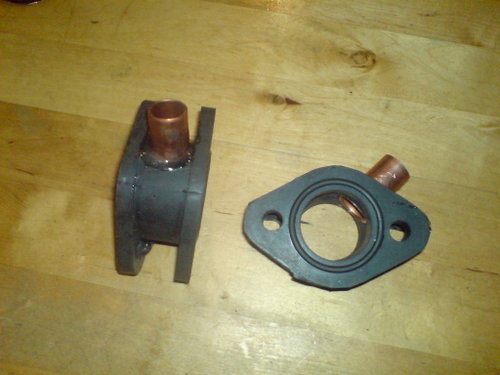
The next items for reworking were the rubber heatproof manifold from MH moto world (http://stores.shop.ebay.co.uk/MH-MOTO-WORLD__W0QQ_armrsZ1 ). I am a big fan of the so-called inertial supercharger that connects the inlet tracts with a large bore rubber hose. The Russian ones a poorly made and mean that you have to swap the carbs over to stop the float bowls hitting the gearbox. They work well on the sidevalve bike but mixture adjustment becomes a bit tricky to say the least! Back in about 1980 I modified the inlet rubbers on my old Yamaha RD250 to have a balance pipe like the RD400 so I know that this can be done successfully (Ah, the memories……oh the broken bones…….them were the days…….they throw you in gaol for that sort of thing these days…….).
Anyway. I bored a hole in the side of the manifold and finished it to 15mm using a Dremel and burr. Next I cut a small section of copper pipe with 16mm outer diameter. This I put into the bore of the manifold and pushed it into the hole from the inside until there was about 3mm left to go. I then ran some superglue round the bit left and shoved it the rest of the way in USING A SCREWDRIVER BLADE, NOT MY FINGERS! I then mixed some epoxy up and ran some of it round the copper tube on the outside of the manifold. Belt and braces – don’t want an air leak here. Here is a shot of the finished manifold ( apart from smoothing out the tube on the inside of the manifold ).
The advantages of doing it this way is that the carb won’t heat the fuel in the foat bowl so I get a cooler, denser mixture, better hot starting along with a good hike in bottom end power thanks to the balance pipe.
The next thing on the list is to make a splitter type throttle cable. Once again I’ve had good experiences with them on my Soviet stuff. I use a throttle from a Suzuki TSX moped as a start point but there are many alteratives out there. You can actually buy the splitter from the Ural 750 seperately and it isn’t (or wasn’t ) to expensive. After that it will be to thow the whole lot together and see how she runs.
Here’s a quick pic after a little work in the club today. She is beginning to look quite pretty.
I whipped off the cylinders and removed the cylinder base gasket and replaced it with silicon. After re-assembling I did some measuring and found I’m going to get a squish clearance on 1.5mm on one side and 1.6mm on the other. Not bad considering all the juggling between pistons and cylinders. I was aiming for about 1mm clearance but this is about as close as I can get without a serious visit to the machine shop.
May’be next time I’ll get to start it.
comment; drmudplugger: Looking good Bill! Doesn’t seem to be much to do before the Test Drive. Yeehah!
SB: I’m afraid it won’t be this week. I didn’t get the coil mounted and ignition set up last night. A good bit of the time was spent grinding lumps of the universal joint casting as it was clouting the inside to the sleeve that covers it. I still have a little to do but it is much better. The drive shaft doesn’t wobble about now either. Of course I have to start of the sidecar too. Hopefully next Tuesday I’ll get to was it down and start rubbing and priming.
Meanwhile some better pics:
comment: richardrussen: BILL!! I whipped off the cylinders and removed the cylinder base gasket and replaced it with silicon. bad idea! resulted in engine damage! the left cylinder has a oil bore and a oil groove. only use thin paper seal!another funny thing is the carburator adapter. you will stay on the side after the engine is hot. the connection between both carburators also a bad idea. please start google translator for my site and read the important tips. I wish that you can rejoice instead of crying 😉
SB: OK, Richard I read your site using Google translater. It looks very like the gasket you had trouble with is of the same origin as the those I was about to put on! I also have a couple of gaskets made in a newer material I will have to check as I can’t remember seeing a hole on these either.
SB: Hah! I’m a jump ahead of you! Actually the gaskets that I took off didn’t have a hole for the oil way to the base of the cylinder. I didn’t actually notice this until I removed it to use silicon. I’ve been sensible with the silicon and used a VERY thin smear on the mating surfaces. I’ve used this trick before on other bikes so I knew to be careful. I probably should have said something about it but life is keeping me busy right now and I forgot. I will of course have a read at your stuff and see what went wrong.
SB: Dec 2009: A quick update.
Got my cross over system from Oldtimergarage yesterday. Needs painted and the insides of the cross over holes smoothed but otherwise looks very well made. Fitting it up will be interesting. It didn’t come with the lugs that fix to the back engine bolt. I’ve seen pictures where a bracket like the Dnepr uses is fitted. Fortunately I have a couple in my spares box. The new Chang Jiang silencers are also here. They are different internally compared to the old ones. The old ones are the same inside as the drawings on Bcozz. The new ones are totally different, possibly more modern design. Whether this is a good thing or not remains to be seen. I hope they flow as well. I might make up a rig to pressure test them to compare back pressure.
My home made 12v regulator isn’t at the moment. I had it to bits with a variable power supply hooked up and measured the inputs and outputs at various places so now I know how it actually works I can wire things up properly! If not then I’ll just have to swallow my pride and either make one using Mr Ballards plans from the Cossack Owners Club or buy a Custom Chrome one from the local Hardley dealer. My, won’t that be fun…..
Apart from the above the bike is finished. As soon as the snow melts I’ll get on to the sidecar and sort that out. I’m now entertaining the idea of using the M1 on our winter rally instead of the MT16. My mate Ole tried to visit through the snow last friday and had to give up half way. He wasn’t too impressed with the sidecar wheel spinning and causing the bike to lose drive on the solo side. Some experimenting with tyre pressure sounds a good idea. We both agree that a diff lock from Oldtimer would be the way to go but they are way too expensive. As things stand it will be a new year before I get to go and play in the garage so
‘GOD JUL OG GODT NYTT ÅR’ from us here in Norge.
P.s. The M1 sounds beautiful! Very little mechanical noise and a steady, slow idle. The sort Hardley Ableson owners dream of. The exhaust note is an even POT….POT….POT….POT…. sound.
comment: changlove4ever: Hi Mate very very nice M72! good job i reckon Best regards from Holland and the very best for it New year enno and annelies
comment: JD: Bill, I would assume that POT…. POT….POT… was with the advance lever retarded just the right ammount!
SB: Nope! Doesn’t have one that works. It was with the Boyer Brandsen ignition retarding the ignition EXACTLY the right amount. The project is stalled waiting on better weather right now. It is too cold to paint the sidecar. I’ve pretty much given up trying to make my home-made regulator work. I ‘ll give it one more try out of bloody mindedness. I bought a Drag Specialities solid state regulator box like the Accel one I used on the K750. It looks very like the Accel and I hope will be just as reliable.
I have my winter rally this weekend and I’ve been busy helping the boys out with their bikes in preparation. We fitted a set of PZ28s to Øyvind’s CJ750. He’s really chuffed with the results. The bike has never sounded better and pulls harder. Benny’s Ural needed a service so I started teaching him the finer arts of Ural ownership. We found the clutch cable was frayed so I cobbled up a new one. A small oil leak we have decided to live with for the moment. Vidar’s bike has behaving itself remarkably well and has just needed minor adjustment. We were hoping his Chinese carbs would arrive in time but that doesn’t look likely. Later we will be fitting CJ750 OHV pistons to this bike as an experiment. More details later! Arild will be using his pretty little MZ outfit. Hopefully he has had time to go over it but I doubt it. I will post the pictures assuming I get home safely. The journey looks as though it will be a bit trickier than usual.
comment: JD: 28 Jan 2010: I should have said POT…da…POT…da… etc. Hope your winter rally is a good one Bill. Hope the camera doesnt freeze over. If it does send it down here, we’ve had over +40C but then now its dropped 20C in an hour and is raining. Go figure. Looking forward to seeing some pics!
comment: drmudplugger: Bill, which Boyer setup do you use with the the CJ and your Russian bikes. I’ve looked at the Boyer site and it doesn’t seem to list our bikes – only pre-1979 BMW’s. I’m not sure that there is a distributor downunder – unless it’s Union Jack in Melb! If you’ve had success with a particular set up – cos they list the micro digital which I think can have a programmed advance curve – I’d appreciate your input (like No 5)! Cheers.
SB: I used a system meant for Nortons as it has a larger diameter stator. Not the micro-digital one as this is out of my price range. Here’s a link to some useful stuff I put on my site, it includes a quick guide as to how I modified the system to fit. A useful note I will add is to wrap the black/white and yellow/black wires from the stator to the black box in aluminium foil and keep them well away from the other wires as electromagnetic interference from them can cause spurious trigger signals. This causes rough running. The PDF shows fitment to an OHV motor. For SV motors the stator has to be round the other way and the taper on the rotor filed/turned down to fit inside the end of the camshaft. The camshaft has to be drilled and tapped down it’s centre to 6mm.
comment: richardrussen: Hey bill, i made a programmable digital ignition called fridaDZS for the old 6V SV with hall sensor for original camshaft fitting. info about that: http://k750.myluna.de [dud link Ed.] Beschreibung tell me if you need one. have fun. cheers richard
Or you can see “metric cutom” YouTube channels https://www.youtube.com/user/rgf77/featured
comment: JD: Hi Richard, “programmable digital ignition called fridaDZS” your are blinding me with Science 🙂 musika: Thomas Dolby “She Blinded Me With Science”. Love your videos.
SB: Very high tech! My system is meant to be easily made by people in a similar position to me. That is, they have a limited budget and basic workshop. Parts are easily available and the Boyer system is known to be reliable. You bike sounds very like mine! I was surprised by the relative lack of mechanical noise on mine. I would appreciate some more information on the Mahle pistons. I’ve got the best part of a spare engine so I’m putting it back together. My cylinder are already bored out to 79mm so I need new ones if I plan to use standard pistons. One thing I am interested in is the weight of the Mahle pistons.
comment: richardrussen: ok, you can use the Velleman ignition: http://www.velleman.eu/distributor/products/view/?id=8946 very simple and low budget! can used with the original break contacts or you can adapt them to an hall sensor or other contactless sensor. cheers, richard
SB: Got one of those. I also have some details on running it on 6 volts. After our little winter rally the guy who owns the bike it was to go own is coming round to the idea of a 12 volts conversion and good lights. The disadvantage the Velleman kit has is that it still uses the contact breaker, half the reason for going to electronic is to get rid of them. I had started to try to build a kit to try some experiments on triggering a Vellemans system by magnet but just don’t have the time. As you seem to be a bit of an electronics wizard how about giving it a try? You could help out all those Soviet Cycle owner who are a bit short of cash?
I hope to get a bit of work done on the sidecar this week. I need to get the tub off so I can wash everything as soon as the weather goes above freezing for any length of time. I also have to make another throttle cable with splitter as we robbed the one on the bike for Øyvinds bike. In the mean time the spares to repair my MT16 are on the way and I have the leading link front end with Hydraulic front brake to finish. That will end up on the MT16 too so I have plenty to be going on with.
SB: And for those interested here is the 6 volt info: http://www.velleman.eu/distributor/products/view/?id=8946
comment: JD: Bill, thanks for sharing all this with us, some priceless gems that will help others for sure. The way you work you will knock over the sidecar in no time.
SB: 3 March 2010: The weather is the hold up now. We have had the toughest winter on record for my part of Norway and the weather men say we may have another 4 weeks of snow. That’s going to double the record number of days with snow on the ground from 50 to over a hundred! I need the temperature to be over 5C before I can paint. All the wheels except one (thanks for reminding me) are rebuilt and painted, 7 in all. I bought a spare wheel bracket as the bike didn’t have one so that has to be painted along with the ammo boxes. The new LED lighting for the sidecar is nearly ready and just has to be fitted. There are a lot of people here who are very curious as to how this thing is going to run and especially if it will pull the higher 3.89 gearing.
SB:20 March 2010: Well the snow finally melted and I’ve repaired the MT16 after it’s fairly spectacular differential failure. I’ll try and find the time to put the pics on the board. I also managed to get the sidecar cleaned and some of the smaller parts painted. Good to get some progress. I also had a little problem with my MT11 that can be useful to know about. My MT11 is in quite a high state of tune and has quite a free flowing exhaust and Chinese carbs and Chang Jiang tank. I recently fitted a K&N filter into the standard Dnepr airbox that has had it’s entry opened up for more air flow. The new filter threw the mixture out quite badly so I went up to a #110 main jet. Not rich enough so I went to a #115. To cut a long story short this had no difference and all the signs are that the fuel tap isn’t flowing enough fuel. I’m working on a solution. The fuel tap I have on the MT11 (and MT16 for that matter ) is the newer type with the Japanese style screw-on tap with the 16mm thread not the old Russian type.
SB: Well the sidecar has now had it’s first coat of paint. The paint I’m using takes a long time to dry and it’s still pretty cold so It will take even longer. If it is touch dry tomorrow night I’m planning on mating it up to the bike. THAT will be progress!
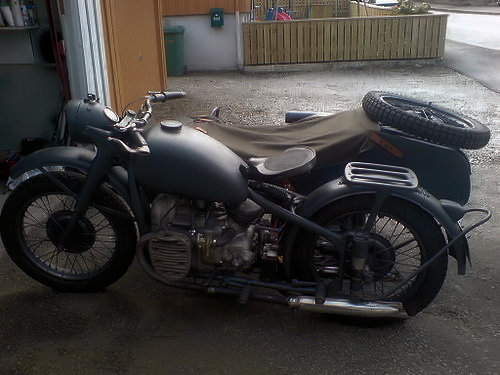
The paint colour I’ve used is the same colour as early WW2 German stuff was painted called, variously, Dunkelgrau, feltgrau, panzergrau etc. The Germans went over to an international paint description standard, from what I’ve managed to figure out anyway. That means the colour has a number some is still applicable today. The paint number is called RAL 7021 and you should be able to get it mixed down at your local car paint dealer. Just in case anybody else finds this useful.
I’m now starting to think of the more detailed things. One of the things I’ve started to do is hand paint the tyre pressures on the mudguards like various armies do. Practical as I’ve got four bikes I can’t remember all the pressures. I will be fitting my ammo boxes which are also now painted but there will be no unit markings of any kind for now as that sort of think is still considered distasteful here.
I’m still considering whether to fit leg shields and a sidecar windscreen. That decision will most likely be made in light of experience. I’ve decided that my deadline to have the bike finished is 1st May when we have our ‘Vårslepp’, our spring run along with just about every other bike owner in Norway. Should be interesting to see if this goes better than the MT16 did!
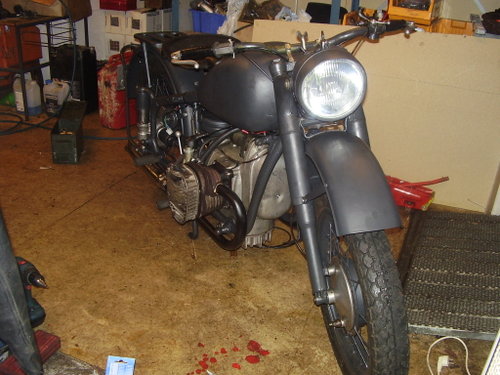
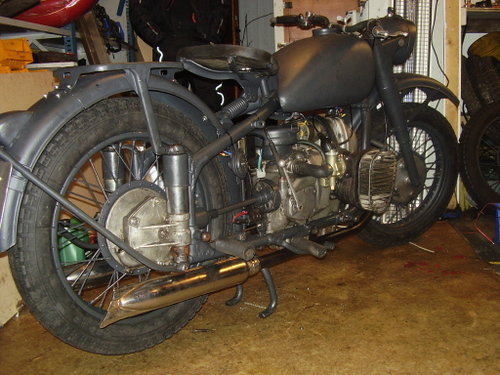
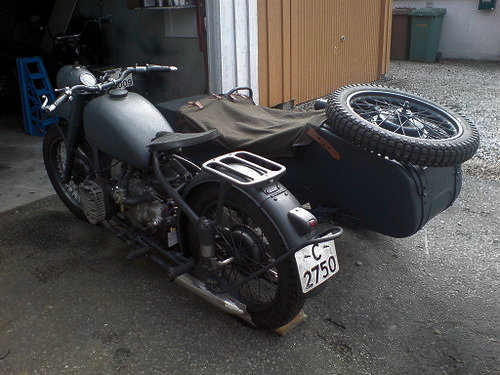
SB: 9 April 2010: Just i case anybody thinks this project has stalled here are some new pics. As can be seen the sidecar is now painted and fitted. The lights are wired up but not connected to the bike yet but that won’t take long. I’ve also got to fit the ammo boxes and paint the insides of them and the boot gloss white. I’ve also got to re-do the throttle splitter as it is preventing the throttle opening fully.
Not bad is it? At least I think it looks OK. Hopefully next week I’ll get to ride it! Once it is rolling I plan to run it in for about 500km and then stick the new exhaust system that has a balance pipe on. This won’t be a true back to back comparison as the silencers I have to match them have different internals of what appears to be a more modern design. A friend has them on an Ural and they sound nice so they don’t seem to be restrictive.
comment: JD: Bill, youre right, it’s not bad at all. Rather good job I say, and you have been very meticulous in every way. Well done!
comment: trebankalien: Looking goood! Looking forward to the riding report!
SB: 16 April 2010: Nope, didn’t get to test it last night. The gods where against it – long story but I need to make a new throttle cable with a splitter that has a longer travel. On the plus side the charging circuit works fine and the headlights are superb. I also discovered that I missed a dodgy wheel bearing so that will have to be changed before I use the bike in anger. There is a bike rally next weekend in Evje and I’d REALLY like to take the M1 to it. Have to get my act together then! As an aside I got the MT16 repaired and have now over 500km on it. It runs beautifully. I’m really pleased with it. The down side is that I now have FOUR functioning bikes with sidecars. I really can’t justify more than two so I will probably have to sell two. As things stand I’ll keep the CJ and MT16 and the Ural and MT11 are looking for good homes. I really don’t want to part with the Ural as it is the first one I bought and is probably one of the sweetest in Norway so that WILL be going to a GOOD home if it does go.
comment: JD: Bill, I had that exact problem, you cant ride more than one at a time, hence Jan got ALL my Urals, and all my Ural parts, but only those that did not also fit Dnepr. Which was about 50/50.
SB: 21 April 2010:
She rolls……………….
I finally got the throttle cable sorted out and also discovered that the sidecar and back wheel bearings were shot so I replaced them. I also discovered that the plate behind the sidecar wheel is wrong so I have to order the right one. The plate that is in there was holding the sidecar wheel too far out so I’ve made a spacer up for the mean time. Lots of small things. Another discovery was that the back wheel hub was contacting the bell that covers the drive shaft UJ. I have no idea why but I had to thin down the bell to get clearance. The problem may be that the driveshaft is too long and compressed against the rubber doughnut and so twisting the Cardan round the plunger shaft. I’m toying with the idea of fitting a Dnepr shaft which is adjustable for length.
So how does it go? Remarkably smoothly was my first impression. The solo gearing feels higher than I expected and I had to slip the clutch to get rolling. Admittedly I had all my tools and stuff loaded into the sidecar to take them home. Once rolling the bike pulled well. The exhaust was deep and burbley which suggests that the mixture is on the rich side. There was some juddering from the clutch which I’m hoping will go away with use. The handling was nice and I understand now how Øyvind manages to get away from us as the bike doesn’t feel like tipping on right handers. She its very low and flat on the road. The steering is heavier than Ural or Dnepr, probably due to the shorter bars. The steering also has a greater tendancy to shake than Ural or Dnepr so the steering damper is a must. The tyre pressures were not correct but I’ll re-check the geometry anyway. The riding position feels quite racey and I’m a little concerned over long distance comfort. I can imagine that a solo with the OHC motor would make a very nice bike. The brakes……er, yes…….lets just say that they should improve when the shoes are worn in. In the meantime I have these hydraulic TLS brakes on the bench that I need to do something with.
When I got home I fitted the ammo boxes to the sidecar and painted them white inside along with the sidecar boot. Makes it easier to find things. The passenger seat also got fitted. Tomorrow I hope to get some riding done to shake the bugs out. There is a rally down the south of Norway this weekend that I’m going to and I’m seriously toying with the idea of taking the CJ. Don’t know if that is a smart thing to do with an untried bike.
comment: JD: Bill, you started this blog in August last year, and I for one have enjoyed reading every word of it, You have a gift in putting it all down and I’m sure others will benefit from your experience. Thanks for sharing it all with us. Brakes!~ Yes, must have brakes! The engine is the main brake! Your’e on a “new” bike so the running in is the key. They can get awfully HOT during this time so thats the main thing to watch for. A leisurely ride to a rally is a good way to test it? If its good to go, I’d go 🙂
SB: 22 April 2010: Thanks JD, I just put things down as they came along along with my thoughts on how I was going to do things.
I was out for a longer run today including a ‘blast’ down the motorway. The bike accelerates quite briskly, not quite as fast as my MT11 with all it’s goodies but not far behind. I’ve still got to dial in the carbs. I went down from about #110 to #104. The plugs still indicate rich and indications are that I need to drop the needle back down a notch. The right cylinder is also burning a little oil but that may disappear as the rings run in. The braking is improving – thank god! The back is the most effective. Handling wise the bike is nothing like what I’m used to. On smooth roads the bike is really sweet. On bumps it isn’t too bad and I would say it handles the speed bumps better than my Dnepr. I wouldn’t like to take it on a long off road run though. Gearing is definitely on the high side. My driveway is pretty steep and I need to hold a bit of momentum as I turn in to come up without having to slip the clutch. Øyvind has to do this on his standard bike too so I’ll have to double check the gearing on his bike. If he has solo gearing too then that could explain a lot of strange things about his bike, like why I struggle to stay with him on the motorway and why his up-hill performance is so crap.
As far as the looks go even my wife commented on it, she likes the colour! The exhaust sound is wonderful, A real head turning distinctive sound without being obtrusive. The sort of sound that catches the ear of any enthusiast within earshot. It will be even better when I tweak the idle down. All in all I’m REALLY pleased with the way the bike turned out. I’ll sort out some more pics when I have time, probably next week. As to whether I’m taking it to the rally, still undecided. I’m very tempted but it would not be good to have any problems on Sunday as I start my new job on Monday and I would prefer to start in a fresh frame of mind.
P.S. I’ve just seen the weather forecast for tomorrow! More snow! Looks like I might be taking the MT16! This is a loooonng winter.
comment: simson425: Hello, can you help me please. can you tell me where can I find pistons for my bike M72. I live in London. I’m looking for Mahle pistons. Please if someone can help. I’ve tried to find Richard’s e-mail, but I couldn’t. Thank you
SONY DSC
comment: JD: try this link, it’s for Mahle: https://www.mahle.com/en/ Hope this helps.
SB: 15 May 2010: Thanks for that link, I might try them for my spare engine.
Progress report
I’ve done a couple of hundred KM on the bike so far. Runs well and doesn’t really notice a passenger too much. The bike is however parked. The fork that goes into the rubber doughnut on the driveshaft has loosened. The fork is pressed on to a taper and doesn’t seem to like the extra horsepower! The irritating bit is that I’ve already ordered a Dnepr shaft which should fit according to my measurements. It will take a couple of weeks to get here but I want to take the bike to a rally next weekend. I’ll now have to take the bike to bits to get the old shaft off and get it welded which is going to duplicate a lot of work.
On that subject, I’ve now started a new job as my ticker is back up and running. That means a normal job for the first time in my life so I’m finding I don’t have as much free time to play with the bikes. That means I’m going to have to get something a bit less labour intensive to get back and fourth from the work. I’ve already planned that the MT16 will go and it must have heard me cos the diff coughed it’s guts all over the road again. It looks like one of the planet gears went this time – it’s not there. I checked everything before I put it back together and didn’t see any fault so I think something is seriously amiss with this Diff. As I’ve no confidence in it any more I’ve ordered a complete new one from the Ukraine, this thing is beginning to irritate!
comment: goldthorpeNZ: Really like reading this. Would make a great book! Seriously!
comment: JD: Yes, SB’s done an excellent coverage of his restoration, invaluable information. This has got to be the best blog on this site! In the top 10 at least!
SB: Thank you very much gentlemen but a book! Only if I end up in the hospital again. Anyway time for a quick update. The exhaust with the balance pipe I got from www.oldtimergarage.eu got fitted along with the fishtails I got from MHmetalheart on Ebay. They gave a slightly softer exhaust note. I THINK there is a bit more low down grunt but it is hard to tell as there is loads anyway. The plug is indicating a touch less rich than it was. The down side is that the pipes are an absolute devil to get on and off, requiring a good bit of levering and a squirt of WD40. There may be a knack here I’ve yet to master.
And why did I need to get them off? Well the experiment with the silicon instead of the cylinder base gasket appears not to have worked. I’ve fitted some base gaskets made from the thinnest gasket paper I’ve got so that will hopefully cure the leak from the LH cylinder. If not then I will suspect that the oil system has too much pressure. That means I will put in 5w30 oil for definite and hope that does the trick. If not then I’ll have to pull the motor to open out the oil orifices.
The driveshaft is now re-welded and refitted. The fork is actually pressed on to a parallel section so I’m not really surprised It let go. I took the opportunity to press the fork 5mm further down the shaft as it was too long causing the Cardan to twist. This put the whole assembly under a lot of stress. The bike rolls better, not that it was difficult to push before, it rolls VERY easily now. My back brake may also function a bit better now too. Hopefully I’ll get the bike back together tonight ready for a longish run this weekend.
The carbs have still to be finally set. I’ve got 110s or so in (Chinese so you never really know exactly). #104 DellOrto jets should get me closer. Ignition timing feels fine but I will mark its position and experiment – maybe. I’m seriously considering fitting a set of Ural 18″ wheels I have. On the chanhjiangunlimited forum a guy has fitted one on the back and another has fitted a Dnepr front brake. If I do this I will probably have to remove the deep sump and fit an Ural ally one. We’ll see. The speedo is miles out with the solo gearing so I’m going to fit a cycle speedo to calibrate it. Lot’s of little things to sort out so I won’t be wrapping up this blog just yet.
SB: 23 May 2010: This weekend I took the bike on it’s first decent, longish run, About 350km in all. Me and my mate Benny went down to a rally at a place called Moi, good do. On the return trip we took a major detour up to the mountains above the snow line. The bike behaves very well. The only hitches was the top of one of the carbs loosening off and sending the carb synchronisation out and oil leaking fron an over-filled Cardan.The run up above the snow line was up over 1000m and the bike didn’t like it. The power dropped off noticeably. I know the mixture is a couple of jet sizes too rich which didn’t help any. The handling was better that Benny’s Ural, especially on right handers.
comment: drmudplugger: Bill, what’s your impression of the Chinese bikes and how do they compare to the Urals and Dneprs seeing that they have come from a common origin. I’ve seen a lot of comments both good and bad, bad comments seem to be from the same place as bad comments regarding the Russian bikes – lack of knowledge so it would be interesting to hear from someone who understands and appreciates these machines. cheers
SB: My impression is that the machining is generally better than Soviet stuff. The bearings are far superior to Soviet ones, I probably didn’t need to replace them. The metallurgy / heat treatment is better than ‘end-of-soviet-era’ stuff but may not be quite as good as earlier Soviet stuff. Welding is on par or better than Ural and way better than my Dnepr.
I’m very happy with the bike but you have to remember that the only things I haven’t dismantled and played with is the crank and the generator and I’ve put the sum of 30 years of farting about with motorcycles into this bike. Fortunately it didn’t cost an arm and a leg. Strangely enough it reminds me of my old Royal Enfield Continental GT. Same faults probably. Iffy brakes, good handling, heavy flywheel and high gearing. Both bikes reward forward planing and smooth riding. The CJ has a better gearbox though, much better!
comment: redrangemagnum: Hi Bill, I finally get to look on your blog after JD “advised”!! me several times. You did an A1 job on the bike and I like all the photos. But a question remains, do the fishtail mufflers give more backpressure against the engine?? Which gives less power, that is my perception. I thought the more open until a point the more power, but sadly more noise. Keep going. Safe riding and take care. Jan
SB: The fishtails on now are fitted to downpipes with a balance pipe. They are different internally to the older ones which are the same internally as the blueprints elsewhere on Bcozz. That makes a direct comparison impossible. The new system is quieter but there are no signs that it limits performance and the engine does not run as hot as my old K750. It also revs very well considering sidevalves tend not to be revy. It is asthmatic but it doesn’t complain. When I took my trip up the mountains last weekend there is a steep stretch that requires second gear on any bike I’ve ever taken up there. It is always too steep for third so you have to hang on to the revs. Most bikes don’t like this and that includes both Dnepr and Ural. The CJ didn’t mind it.
As for the generator, I did clean it out but I havn’t changed the bearings yet. I plan to put in some sealed ones – eventually. Life is pretty busy right now so everything is getting done on an ad hoc basis for the forseeable future.
comment; redreangemagnum: Hi Bill, Ta for the explanation. And I am jealous of your tool pegboard, in my place all the spanners are in drawers. I will have to do something about that now!! Safe riding and see you later. Jan
comment: JD: Hi Bill, perhaps the exhaust balance pipe has improved torque as intended for that hill you mention. Jan, paint your tools blue or yellow, any colour than red, my tools are RED and stamped with a “J”, as you know 🙂 I wish my MT-9 had those fishtails, they look excellent. Mind you, mine sound good too, maybe on a slightly different note, nice and deep. But the old side-valves have a note all on their own dont they. Like Mr Philthy Cossack said, “Ahhh, Cossacks in the night, what sweet music they make!” Nothing like a group run on these machines.
SB: 12 June 2010: Yes JD I agree that the balance pipe is probably the reason for the improved torque. The fishtails do look nice but will no doubt rust at the first sign of a rain shower. And they definitely sound nice. The Harley guys always comment on it, especially with the idle set up at about 500rpm! I’ve tweaked down the mixture and now use #102 Dellorto jets. The exhaust is a bit quieter and she goes better at high revs.
I’ve also indexed the plugs. For those that have never heard of this it means that the plugs have been shimmed so that the earth electrode is pointing away from centre of the combustion chamber. This helps the flame spread quickly and evenly across the chamber. Does it work? The only difference I’ve noticed is that on my ‘test hill’ on the way to work the speed used to decay as I neared the top. Now it doesn’t. Apart from that I didn’t noticed the difference. I would say it is worth doing. I cut the shims from the copper I had left over from making the head gaskets – 0.6mm thick. One was enough.
I’ve also balanced the wheels and tweaked the spokes on the front wheel to make it more round. She has been used to get me back and forth to work now for over a month plus a few longer trips and has been fault free. While out on one run I met an ex-owner of a BMW R71. He liked the bike and we had a good old natter about them. While chugging around I’ve found I see more of the landscape than with the Russian bikes. Probably because the bike is nicer to ride and is better on right handers. I even managed to catch up with a VFR800 on one long downhill stretch so don’t get the idea that the bike has an easy life (he was two-up and obviously not trying that hard!). Stopping for the ‘T’ junction at the bottom of the hill was exciting. Fortunately the brakes have improved with use although they are still crap. Wet weather riding is different from my Soviet stuff too. The front doesn’t break loose on roundabouts like Soviet stuff does but the back end steps out easier. Fortunately it is very controllable which makes it good fun. On the cosmetic side I’ve fixed a Wehrmacht gas mask can to the sidecar handle like I’ve seen on a few WW2 photos. I picked it up relatively cheaply at an autojumble last year just after I got the bike. I have a Thermos that fits it just nicely. Next week I will change the front wheel bearings and maybe the dynamo bearings if I have the time.
That’s it for the moment
comment: dicewithdeath: I’ve just been reading about this interesting project & the comments. It’s a bit after the fact I know, but re. Boyer Bransden ignitions availability in Oz: British Spares in NZ sell these, I believe. www.britishspares.com -Joe
SB : 22 August 2010: Another update!
I’ve been using the bike regularly to go back and forward to my new job plus quite a few longer trips. The only problem has been contact between the spokes at the hub with the bell that covers the universal joint. This was a strange one and often was accompanied by the axle loosening even though the split pin was in! The one day on the way back from a trip the handling went off completely and the problem with the spoke contact came back in spades. To cut a longish story short I found the axle had snapped through the threads. What appears to have happened is the threads have started stretching. I’ve fitted an Ural axle plus spacer for the time being. Now the handling is MUCH better.
And now I’ll admit the big mistake I made. I should have replaced the 6 pins in the flywheel that go through the steel clutch plates. I saw they were slightly notched and thought they would be OK. The clutch sometimes hangs so I was obviously wrong. I’ve got all the bits now to start building my spare bottom end with the experience I’ve gained from this project. I’ll try and locate some Renault Fuego pistons to try too if I can stretch the finances to them. Time and energy have been a problem lately. The new job is a lot of hard work but it’s good for getting my ticker back in shape. That’s it for the moment.
comment: JD: Bill, thats a bit worrying about the axle. In 1979 I was following a mate on his K-650 solo, me on my MT-9 solo, I saw his axle nut fly off, I tried to get his attention but he thought it was a race and he sped off. His rear axle started to come out, I could see it getting longer, slowly coming further and further out. I had to ride like a maniac to almost force him off the road, He said “What’s up?” and I pointed to his axle sticking out, another minute or so could have been disaster. Lesson: tighten that axle locking bolt and use the biggest split you can find! and… check it regularly! Before every ride and at every stop!
comment: trebankalien: Good to hear that the machine is behaving (more or less as supposed) after that overhauling. Many good trips for u both!
SB: 30 September 2010: Hmm! Had a little problem earlier this week. The steel ring round the rubber ‘doughnut’ snapped! Spotted it on the way to work at a set of lights so I was able to fish it off before the lights changed and carry on – CAREFULLY! Easy enough to fix. Off with the back wheel, screw of the bell cover over the universal joint and twist the Kardan to the side to disengage the drive shaft.
On another subject. My parcel finally got here with the spares I ordered from MHmetalheart back in May (The Norwegian post office cocked up quite badly). In it was a special tools kit which will make life a lot easier. A lot of the tools look like they will fit my Ural 650 too.
Also in the pack were 2 brass floats for my PZ28 carbs. They are very well made. I weighed them and found they were actually 1 gram lighter than my plastic ones 7 against 8 grams. This will allow the floats to close off the fuel supply earlier and so lower the fuel level in the float bowl. This will effect the mixture and probably quite noticeably. The mixture will be weaker. The needle was also slightly higher above the float than on the plastic ones so that will probably make the level even lower. I will make up a U-tube and check this. The other problem is that the tickler rod is not long enough to depress the float so this will need looking at. This all may not sound good but there are upsides. First, my mixture is a bit rich at idle and I have to screw the air jet to 3/4 of out to get it right. Using the brass float may allow me to get the mixture a bit nearer the optimum at small openings while a bigger main will bring things back into line at large openings. Second, a lighter float has less mass and so less inertia. That means the side loadings during cornering are less likely to muck up the carburation.
The lighter float might also give a higher seating force on to the float needle. This might prevent the carbs pissing fuel over the garage floor when the bike is parked. If that doesn’t work then I’ll probably stick on a set of Kiehin copies as on my other bikes. Fuel consumption and power will probably pick up a bit if I do this but they might not look right.
comment: JD: A distinct advantage of the old plunger frame and final drive design. Later bikes you have to remove the final drive to remove the flexible coupling (rubber doughnut).
Good luck with the carbs Bill! I ALWAYS turn off the fuel tap everytime I turn the ignition off. I went out to my shed one day and I could smell fuel, all $15 of it had leaked on the concrete floor under the bike, luckily there was no source of ignition, it would have gone off like a bomb!!!
SB: The tap is way stiff. Yes I KNOW that I should fix it. I’ll probably have a mess about with the brass floats this week. I was reluctant to do it before as I was supposed to go on a rally this weekend. Numerous small things plus the weather conspired to torpedo that plan. I did manage to get a 10 litre jerry can mounted on the sidecar. One of my mates gave me a bracket a couple of days after I found a jerry can in a rubbish skip. Now if that isn’t a hint I don’t know what is.
comment: JD: The fuel tap should be firm, and not sloppy. Main thing is it shuts OFF the flow when its off! I dont know about yours (and others) but mine has a woeful lack of fuel in the reserve position, enough for about 10 minutes to get you to a fuel stop, if you’re lucky. I guess thats why they invented jerry cans :-0
SB: I usually pull the brass pipes out the top and run a drill through the tap in the open and reserve position. Then I knock the thin pipe back in after de-burring both ends. This normally causes a considerable improvement. The tap can be adjusted by taking off the tap handle and then tweaking the little sleeve nut that goes over the shaft.
This needs photo doesn’t it? See what I can dig up in the garage.
SB: 13 October 2010L: Way back when I started this project I talked about welding up the cylinder head to improve it’s shape and increase compression. Well it looks like Richard beat me to it. See: http:// [sorry link corrupted, Ed.] This is EXACTLY what I considered doing so it’s good to see somebody else agrees. I would love to know how much difference the mod made and it if it was worth the effort. My brother has just returned my Mig welder you see……..
comment: JD: Hi Bill, the link in your previous message took me to Richards’s generator oil seal solution. I’ve clicked around his site trying to find the cylinder head improvement, got another link? (think site is now defunct, sadly. JD). I remember years ago Jerry built up some “squish areas” inside his Ural’s cylinder head to give some extra oomph, and it worked.
SB: 15 Oct 2010; I’ve been chasing up a set of the Renault pistons locally and even found the local Mahle dealer. They were a bit expensive and I’ve put them on hold til I’ve tried other avenues. One of these ‘avenues’ Was to try and find a Kolben Schmitt (KS) catalogue. I succeeded and it has all sorts in (https://www.ms-motorservice.com/en/ and right down the bottom is the complete catalogue ). The good thing is my favourite mechanical workshop is the supplier. Anyway the KS number for the pistons is 93 697 600. The catalogue also gives piston dimensions which is really handy.
Another thing I may try if I can stretch the finances is to fit a barrel roller bearing on the flywheel side of the crank. I’ve used spherical ball bearings in that position before and it makes for a smooth, freer reving motor – in my experience anyway. The down side is they are not as strong as a standard roller bearing. I gambled on the chance that they are still stronger than the original Russian ones. Anyway, this time I plan to do it properly and fit the barrel roller. The advantage of the this arrangement is it compensates for some misalignment and flex as well as being better at supporting radial loads. The FAG number is 20207 for anybody who’s interested.
I shot blasted a set of CJ heads in preparation for welding so it looks like a fairly hot engine might be on the cards. I’m now sort of asking myself what the hell I’m doing this for. In truth I think it is purely and simply for fun. I’ve got enough bits to build a motor, gearbox and Cardan. Obviously I’m on the look out for something to join all the bits together, a solo might be nice……..
comment: JD: As I understand things (not all things mind you) the crankshaft rear main bearing is supposed to have some flex (how much flex I dont know), would using barrel roller bearings inhibit this, or keep it all in line? An interesting thought Bill. Looking forward to any developments!
SB: The barrel roller allows the centre of the bearing to move to line itself up with the shaft. Russian ball bearings run a lot of clearance to achieve the same thing. Using a couple of spherical ball bearings in a gearbox was Dave of F2 Motorcycles idea. Makes for a smooth box but it can be an absolute BASTARD to get the gearbox back together as the input and output shaft fall all over the place. See this: https://www.schaeffler.de/content.schaeffler.de/en/index.jsp
Time for some new pictures I think.
The first here is a pic of all four types of float available for PZ and K series carbs together with their weights. As can be seen they mostly weigh 9 grams except for the last one which weighs 7 grams. About a 15% difference which Iexpect to make a difference.
Next is a pic of the Spherical or Self-aligning Roller Bearing that I am going to fit to the Hot Rod motor (now the official name).
You can see the shape of the rollers quite well. This bearing was EXPENSIVE. More than for all the other bearing in the motor and gearbox put together! I hope it will be worth it.
I’ve also fitted a Dnepr drive shaft to the bike. The Chang Jiang one was under some compressive load against the rubber doughnut. This is not good for either the life of the doughnut or the universal joint. It also causes the forks that mate into the doughnut to rub which causes a lot of friction. This increases rolling resistance. This may be a problem isolated to my bike but now it is cured. I had to shorten the Dnepr shaft about 5mm and dress back the universal joint to increase the available angular deflection so I could get the thing in. It wa a pig of a job and I may have been better taking the final drive off.
comment: JD: Bill posted some useful stuff, just putting a list of them here, to bring it to everyones attention. Articles so far:
balance pipe calc – Ural.xls BRAKE IMPROVEMENTS edited.pdf CRANK ANGLE TO DISTANCE BTDC.xls ENGINE C – Ural.xls K63 & 65 REBIULD Ver2.pdf K68 emulsion circuit – draught 3.pdf Serious Blacks Boyer Brandson fitting instructions.pdf Updated bearing list.pdf fine tuning on the road.pdf
Maybe one day they can be found again and reposted here.
SB: Here is an addendum to the ramblings about the different cylinder heads for CJs That I did a way back at the beginning of this blog. At my new job I have access to a bead blaster so I’ve been cleaning a few things up. I blasted all the spares cylinder heads that I and my mate Øyvind have. The clean up showed that we have two different patterns of cylinder head. The set that originate from my spare engine have a higher compression due to a higher squish platform compares to the others. The chambers over the valves are slightly shallower too. Here are the pics:
This is the ‘Low compression’ type. The squish platform is 4.5mm high, the chamber above the inlet valve is 11mm deep, the one above the exhaust valve is 8.5mm deep and the plug hole has a bronze insert.
This one is the ‘high compression pattern. The squish platform is 5.5mm high, the chamber over the inlet valve is 9mm deep, the one over the exhaust valve is 7.5mm deep and there is no insert in the plug hole. The machined part in the chamber over the exhaust port is off a slightly different shape which is just discernible in the pictures.
I noted earlier that the K750 heads had a 5mm squish platform and a much shallower chamber over the inlet valve. As the specs say the K750 has a 6/1 compression ratio compared to 5 – 5.5/1 claimed for the Chang Jiang I put in K750 heads. I plan to measure the chamber volumes of both heads to compare them to the K750 heads to see which has the highest compression.
The only external difference is that the low compression pattern heads have a couple of Chinese characters in the middle while the high compression type do not. The high compression type casting is not as ‘nice’ as the low compression type although, Mickie here says, they both look like they’ve been carved with an axe.
In any case, I plan to weld up the heads to match what I said earlier in the blog. The plan will to be to raise the compression and improve the chamber shape to minimize it’s surface area. I also hope to improve the profile to improve the movement of gas around in the head. If by some miracle I end up with too much compression then I remove metal around the valve area to improve flow in and out of the cylinder. A bit of a tall order!
SB: 10 Nov 2010: Just got the new valves from Leszek at www.oldtimergarage.eu . VERY nice. They are stainless and the same pattern as the original valves. The ones I bought from him before were modified. I would recommend these for anybody rebuilding a sidevalve motor. And NO he didn’t pay me to say that!
I took all my other valves in to work where I have access to a glass blaster. Very interesting examining the valves afterwards. The Russian made valves were of better quality than the Chinese ones, even though the motor they came from appears to have had a tough life including throwing a rod. Some of the CJ valves were almost unused and had pitting corrosion. I plan to use Russian valves on the inlet side and Oldtimers on the exhaust. I would suggest this is the best combination.
comment: JD: Bill , I assume you have unleaded petrol over there. I use a little bit of “Upper Cylinder Lubricant” in the fuel. I used to be able to get a couple of products called Red-X and Firezone, these days I just put in about 20ml of 2-stroke oil to 20 litres of unleaded fuel. It lubricates the valves and upper cylinders, also improves and equalizes compression. Not enough to have a smoky exhaust pipe, but enough to do the job. It makes a difference over time. Cheers!
SB: I use a two stroke meant for outboard motors. It’s to a standard called TC-W3. Supposedly in very small amounts it gives a small power increase. I use a cap full every fill up. The bike certainly FEELS nicer, about the same as running the bike on 98 octane. The plug colour changes to a slightly more red shade but appears slightly cleaner.
We used to get Redex in the UK. Never really noticed any difference.
comment: dicewithdeath: Thanks for the idea re. upper cylinder lubrication. I’ve often thought about the unleaded petrol issue. I’ve wondered if “early” Urals & Dneprs were designed for leaded fuel i.e. that this was standard across the USSR; or if they made the engine for a very basic, no-frills petrol. Joe
comment: JD: Fuel in the USSR was just 72 octane, thats what the (early) soviet bikes were designed for. Todays higher octance fuels is a bit like Burt Munro putting a nitro pill in his fuel tank 🙂
SB: That’s why I try to up the compression on all my bikes except the Dnepr. These have a huge, ugly , sharp-edged dome on the top of the piston that really mucks up the combustion chamber shape. If I could have got them at the time I’d have used the older, rounded dome type. With Dnepr you also have to remember that cylinder length was used to adjust compression ratio. This can cause havoc if you have late pistons with a set of short cylinders. Urals have flat top pistons with a squish band. To up the compression I usually skin the head. Never had the guts to take more than a 1mm off along with 0.6mm head gaskets but heard of someone who machines off everything down to the squish band and uses the head gasket to set the squish clearance. The good thing about the flat top piston is that it is lighter. I’ve got some CJ750 OHC piston that I’m going to mod to fit my Ural. The top of the piston will need a little work on a lathe to make it fit but the pistons are beautiful and also CHEAP! Good rings too. Increasing the CR on the sidevalvers is a big priority as the compression is so low. Higher compression improves the efficiency so you get more power and better fuel economy. It can also improve mechanical reliability too!
comment: JD: Yes Bill, the later model Dnepr pistons, ie from 1980s onwards. My 1974 Dnepr MT-9 pistons are slightly domed with small cutouts for the valves. Photo I took is of Andy’s bike.
comment: dicewithdeath: A belated note re. “the self-aligning bearing”. I found the following page useful under the heading “CARB toroidal roller bearings” If you click on “Demo, self-aligning” and “Demo, axial displacement” you can watch cute little animated, moving diagrams showing the motion. These helped me ‘get’ why you might choose to use one. http://www.skf.com – Joe
SB: 25 Dec 2010: JD, I would rather have used the MT10-36 pistons with there more rounded profile. Slightly lower compression but I’m sure that could be remedied by machining the cylinders. I have thought of using three ring pistons meant for the OHC Chang Jiang motor as these look to have a similar dome. I may do this yet as my plans for selling one of my bikes are under revision. I’ve been riding my MT16 through some serious winter weather and it has surprised me (the neighbours and all my workmates) as to how well it copes. My plan was to sell it and keep the Ural. The Chang Jiang will be kept whatever I decide. The difficulty is that I only have room for two outfits if I’m to have a solo too and SWMBO want’s her bike in the garage. The MT16 is a superb winter bike but the Ural is better for the rest of the year and long journeys (less moving parts = better economy and reliability )
comment: JD: I have the same problem, just not enough room in my small motor house/workshop. Before I succumbed and sold my Urals to Jan, I built a narrow lean to against the side wall, just wide enough to fit a row of three solos. Few flower pots on top and it looked ok. It was only a temporary measure but it kept most of my bikes out of the weather. After selling 5 Urals and 3 Voskhod 175 I finally has some space again. But then I bought another MT-9 making that 4 Dneprs now, somehow I still dont have enough room. Sounds like another shed is in order…
SB: That idea has already been suggested. If I had more space I’d only fill it with more ‘junk’ as SWMBO puts it.
Just before I went away for Christmas hols I got the missing bit for the K750 electronic ignition. No pic yet, that will have to wait for next year. In the mean time I’d already started working on my own solution. A major discovery was that the head of a 6mm Allen screw fits perfectly down the middle of the sidevalve camshaft. I next drilled out a 14mm nut to 14mm so it fitted over the outside of the end of the shaft where the dizzy rotor normally would. I then drilled and tapped a 3mm thread in the side of the nut and fitted a lock screw to hold the Allen screw in place. Later on it occurred to me to just drill and tap the head of the Allen screw to achieve the same thing. Tapping a 3mm thread is a bugger of a job and needs patience so I was also thinking of taking it up to 4mm and filing/Dremeling the slot to suit. I think this may be a better solution. Once again I’ll sort out some pics.
From what I’ve been able to find out the ignition system is set up with the motor at TDC and then the rotor is fitted so that there is no play and it can still rotate. The rotor is then turned so that it enters the Hall trigger and the light goes out. Lock everything down without disturbing it. That gets you a basic setting so that the engine will start. Don’t make the mistake of turning the unit to get the highest idle. An engine at idle likes A LOT of advance so you will end up with far too much advance off Idle.
SB: Pictures time.
This shows the picture of the end of the camshaft with the Russian adapter on the right and my home made on the left. The Russian one will probably work better but mine will suffice if you haven’t got an adapter.
This pic is from the opposite direction
And this pic shows my solution fitted. You should note that the threaded section should be packed out with washers so that when the nut that holds the rotor on is tightened down it doesn’t act against the end of the cam and draw the Allen screw out of the end of the cam.
And this shows the adapter on the end of the cam. I would suggest that the main thing to watch out for with both solutions is that the rotor is concentric. If it is not then there will be a timing difference between cylinders. Something the Boyer system avoids by having two triggers set 180 degrees apart.
comment: dicewithdeath: Hey there William. I have a question that you might be able to answer because of your experience with Urals and CJ’s.
I need new exhaust pipes (chromed) for the 1971 Ural M63. I have seen some CJ750 OHV pipes on MHMetalheart’s eBay store. These appear to be push-on, as I need. (1) Do you have any feedback in terms of size (OD at the push-in end), and whether these would fit the Ural head? (2) Have you any experience of the quality of such parts i.e. tube wall thickness and chrome? In the past, I have bought some parts from Mr Metalheart. Some robust parts, such as a rear carrier were fine, but some lights (sidecar running light, and indicators), arrived all smashed up due to their inferior quality, including glass like toffee. I put them in the bin and down to experience but had some explaining to do to my wife – which she ultimately, accepted.
If I have the pipes made-up locally it will cost an arm and a leg; likewise buying new stock from Ural Australia or from the UK. – Joe
comment: JD: Joe, if you have header pipes made up locally it is most likely they will have to have two bends, and not a single radius curve. I have this type on one of my Dneprs, and I quite like them, perhaps they even add that little bit of extra back-pressure. Barry Bligh at Overland Equipment in Mortlake, Victoria can do them for you, but he only does stainless steel. He can make ANYTHING!!! http://www.dropbears.com/o/overlander/index.htm He has an M-63 Ural in his collection.
SB: OHC pipes are held on with collars a la Dnepr. I’ve never seen a set but sidevalve pipes are crap quality where ever you get them. I’ve seen some SS pipes advertised for the OHC bike including straight throughs. Don’t know what their like though.
comment: dicewithdeath: That’s a help Bill. Thanks. JD, part of your comment about the Overlander guy having an M63 was off my rectangular computer screen, so I have only just read it. Thanks. – Joe
SB: 21 Jan 2011: I picked up a couple of books off Ebay recently. One on carbs for soviet bikes and the other on servicing them – in Cyrillic!. With the help of Google Translate and the symbol program on Ubuntu Linux I managed to translate some useful info for K37 (or as CJ owners know them PZ24) carbs. First is that the float is supposed to weigh 8.5 grams. Interesting to compare this to the floats I weighed. Next is that the float fuel level is 21mm bellow the float bowl edge. To measure this you need to make a manometer that fits on the bottom of the float bowl. I would expect this measurement to be the same on PZ28s. I havn’t figured out how to adjust the level yet. This may be done by swapping floats. The main jets on Soviet bikes are calibrated in cc/minute with 1m pressure head, not sure yet if this is with water of petrol. The K37/PZ24 should have a main jet that flows 160cc/min and the idle jet should flow 21cc/min. Keihin and Mikuni both calibrate their hexagonal jets in cc/min as opposed to hole size on the round jets. Pity that, it could have made our life a lot easier! Haven’t tried the hexagonal jets in the PZ28s jet but i will.
I also found a reasonably priced set of cylinders on ebay so I ordered them instead of trying the 79mm Mahle pistons. It was easier! I also ordered a set of High speed CJ750 pistons from this guy: http://www.chang-jiang.com/ . He has been helpful over epost. I paid him by Paypal and the pistons should take a couple of weeks. If they are good then I’ll probably have to get a set for Øyvind ( Who’s engine is on my workbench getting the treatment right now). It’s my winter rally next weekend and my brother and a mate will be borrowing a couple of outfits so I’m running round like a maniac getting three bikes ready AND building the engine. I’m not going to do this next year!
comment: dicewithdeath: I used the link to look at that CJ site. Are there lots of different Chinese factories making CJ’s in competition with eachother?
This factory offers an “improved Chang Jiang 750 as per our customers request and called: Dong Tian 750”. They also make a replica of a Jawa 250.
comment: JD: The Chinese bikes (M-72 750SV copies) have been called all sorts of things, X-Series, Gongan, Tincan, Chang Jiang, then there are the later 750 OHV variants.
SB: If I remember right the Dong Tian is a parallel twin. I just translated the K37 stuff in the carb book and it gives the fuel level distance to the top of the float chamber as 19.5mm! Oh well, that’s the Soviets for you.
SB: OK Gentlemen, the new High speed pistons have arrived and here’s the photos.
This shows the new piston next to the old. You can see the oil ring is a modern 3 piece type. This and the two compression rings are thinner than standard. I happen to have a set of high speed pistons for the OHC Chang Jiang and they are the same. They are NOT the same as standard OHC piston however.
This shows the pistons side by side. The high speed one are 20 grams lighter. Not that much you might think but when I used CJ piston pins in my Ural it made a noticeable improvement. The engine was much smoother. The piston pins were 23 grams lighter than Ural ones but otherwise the same.
This final pic shows that the high speed piston is made from the same casting as the standard piston. The bumps that support the piston round the bottom oil ring on the standard piston are still there. These I intend to remove to cut a little bit more weight. It will be interesting to see how they perform. This is the guy I bought them off: http://www.chang-jiang.com/ . They took about a week from China to Norway. I paid over Paypal and he was helpful and quick with replies. His English is a bit ropey but you get the gist.
And why have I got so many OHC pistons? We are going to put some in a couple of 650 Urals. This will give a higher compression and hopefully cut oil consumption.
The cylinder I ordered have also arrived. It is interesting to compare the Chinese and Soviet cylinders. The Soviet ports are nicer, a better profile. The combustion chambers are about as bad as the Chinese ones, maybe slightly worse, so I’ll have a bit of work to even the compressions and profiles. I plan to have valve seals fitted against the advice of the machinist I use. Some things you just have to try. I may have the guides K-lined if he recommends it as I’ll be using a stainless exhaust valve. All this will take several weeks.
comment: changlove4ever: Hey Bill The old fart is doing his very best not too let any chang in his club but The changs are here now! Where in for life now? life is short best enjoy a good bike and ride it what ever it is ride it for ever! – Enno
commment: JD: I remember being in Bob’s Chang sidecar on a few acres of land, it was an RMOA Russian Owners Day (ROD) what year I forget, mid-1980s?, but I remember Bob let rip on his Chang, it handled superbly, and I’m talking drifts in 3rd gear at 60km/h! Friggin’ fantasticfun , but then the crank broke, but that came later. On a good day, at full (read extreme) operating conditions, it’s a sure force to be reckoned with!
SB: 1 April 2011: Might be time to update this a bit!
I’ve run the MT16 the whole winter so now I have to overhaul it for selling. The CJ has been used for the last month to comute to work. No problems apart from pissing a couple of litres of petrol on the works carpark due to a sticking float. This requires a float chamber top from the old PZ24s to fix. I later fitted the brass floats from the K301 carbs. after experimenting with the light brass floats. The light floats had to be removed as the tickler wouldn’t reach them so I couldn’t flood them to start the bike! The ‘heavy’ floats worked fine although the mixture had changed. The bike runs with a more correct mixture at part throttle and feels about the same on full throttle. I had the bike flat out down the motorway yesterday, up hill, down dale, for about 5-6km. Seeing as my youngest was in the tub and my eldest was on the pillion I reckon the mixture must be about right as I didn’t melt a piston. I was over 90km/h for a good bit of the trip.
Another major problem that reared it’s ugly head when I changed the tyres was that the back wheel spokes made contact with the bell cover that goes over the UJ on the final drive, AGAIN! after a lot of exploration I found the cover on the final drive was worn internally allowing the wheel spindle to move under load. I’ve managed to find a place that will sell me a new cover for a reasonable price. I’ll post photos of this when I fix it.
I also found something interesting when I did a service the other day. The bike had developed a bit of a stumble off idle. When I checked the plug gaps one was 0.8mm and the other 0.9. I set both to 0.8 and the stumble is almost gone. I use a Honda coil from an 1100 Magna. I might drop the gap to 0.7mm to see what happens. On the subject of ignition, I haven’t touched the timing since I fitted the Boyer Brandsen system so I should really try it and see if there is any power to be gained. I will be surprised if I hit the right setting first go!
The Hot-rod motor project has stalled a bit for the moment while I catch up on the maintenance and spring cleaning.
Oh yeah, and here is a very pretty site! http://www.beijingsidecars.com/photosm72.html
comment: JD: Hi Bill, yes that is a pretty sight [site, sic]. I like the art on the homepage. I understand about the fuel loss, I lost $15 of fuel to my garage floor, I smelt fuel and slowly opened the roller door. Luckily there was no spark or source of ignition or it would have been kaboooom! Turn that fuel tap OFF!
comment: jonnyr50: 24 June 2011: Hi Bill, mighty impressive job! could you help me with some advice? ive got hold of a new chang jiang wheel that i want to use on the back of my mt-11, what do you reckon is the easiest/best way to get the brake shoes to fit? cheers
comment: iantochips: 21 Sept 2011 What a great site/story of Bill’s development odyssey! Just stumbled on you lot. I’m shopping for an outfit now after 40 years wth no sidecar. Gotta be one of the Ural/Dnepr/Chang family. Gwil from Portugal.
comment: JD: 18 Dec 2011: Been a bit slack here, Bill’s Chang must be running well (I hope :-). Greetings to Portugal!
SB: 18 Dec 2011: That was very timely JD, I’d planned to update this this weekend!
The CJ is still puttering along nicely. I took her to the first rally of the season at a place called Evje just north of Kristiansand and to the east of Norway on holiday. It’s been a particularly wet year which the bike has tackled well. I’ve had some wonderful looks when blasting through flooded roads in a cloud of steam. The only trouble the weather has caused was water in the float bowls. I sealed where the throttle cables go into the rubber caps on top of the carbs. Seems to have done the trick.
The only problem of any nore was the generator working it’s way out of mesh while I was on the way home from hols. I didn’t diagnose what the problem was on the spot and ended up fitting one of the smaller 7amp generators. This is how I know that they function fine with the Custom Chrome HD 12v regulator box. A touch more revs are required to put the charging light out but otherwise no problems.
I fitted Dnepr wheels and front brake to try and improve the stopping power. This was only partially successful as the brake drums are not concentric. I’m making a tool to allow me to machine the hubs to true them and the brake shoes. If it is a success I’ll post the details. Another problem may be that the reverse style handlebar levers may be flexing. The only way to cure that without replacing them may be to make a set of levers from stainless, a lot of work.
The bike is used back and forward to work every day during the winter and handles ice and snow with gusto. Mostly to the surprise of my workmates. This has taken it’s toll cosmetically. The exhaust are rusty but solid and the paint is scrapped and chipped. Gives the bike a nice ‘old’ patina! The worst problem is that the tank has been covered by several layers of filler to a depth of about 6mm and this has reacted to the Norwegian petrol. About half the area of the top of the tank has pealed off and looks terrible. Next spring the tank with get stripped and painted properly.
The spare engine is still on the bench awaiting me getting my shit together and delivering the cylinders to the engineers to get the valve guides K-lined on the exhaust side to match the stainless exhaust valves. I hope to get him to machine the top of the guides for valves seals so this engine doesn’t drink so much expensive synthetic oil. The new cylinders were from Ukrania and the ports and combustion chambers were TERRIBLE. I’ve had to do a lot of work to make them decent. Spending a bit more for Chinese cylinders may have been a better idea.
I haven’t got round to welding the heads up yet but this will have to be done before the winter rally as the K750 heads on the bike have thrown up a problem. The plug threads are in a bronze insert that is cast into the heads. One has loosened so the head leaks. This saps the power quite a bit on hills. I had this problem on my Royal Enfield but managed to fix this with super glue run into the head from the inside.
Life has been busy which is the main reason I haven’t managed to keep this updated. The job has required overtime, my boys are a lot bigger and I’ve been roped into helping out with the Scouts so that has taken away some free time. Add onto this that the whole family has taken up riding and you can see where all the time and money has gone!
Oh yeah, and there is the Ducati 900SS…………… seriousbill
comment: JD: Bill, you’re a busy man, but it’s great to read your updates here! Ducati bolognaise eh…… 🙂
SB: 20 Dec 2011: Yep, already modified it a bit. I fitted and ignitech electronic ignition unit from Czechia. The is PC programmable. It is also fairly cheap and a ‘standard’ mod on 900SS’s of my vintage – 1993. Mine has been further modded to enable the TPS to help civilise the bike in town. This system is adapteble to many bikes in the same way as the Boyer system is. Check it out: https://www.ignitech.cz/en/ This could be interesting to try on a Soviet boxer.
comment: JD: The IgniTech systems sound pretty amazing to an old-fashioned contact points person like me. Amazing world we live in where you can use your pc to “tweak” your engine. But then all modern cars have a “black box” these days and you probably need special factory tools for servicing, like VW.
comment: JD: 9 Feb 2012: Bill, I hear the North is having a pretty severe Winter early 2012, like temps of -30C in parts, hence I dont think there would be too many motorcycles on the road at this time. We’re very lucky here, no snow or freezing temps, but lots of rain. The experts can’t agree if it is global warming or global cooling. One year it’s one and the next the other. Whatever, may the road be with you.
SB: 12 Feb2012: Not so bad here. The CJ is hors d’combat under a pile of snow right now. I’d been using it as transport to and from work since october without doing much in the way of maintenance. Lately it has been a bit harder to start and this seems to be down to the electronic ignition sticking at full advance. This may have been caused by a dodgy connection inside the original CJ igniton switch. Things culminated in my attempt to get to my winter rally this year.
I got about 30km from home and had to turn back and nurse the bike back as it ran like crap. I transfered the petrol to the Ural and we set off the next day. Then Øyvinds CJ started playing silly buggers and eventually went onto one cylinder. We nursed it to a ferry then tried to get it home. To cut a long story short I ended up towing him about 30 km home. No winter rally for us.
I’ve been using the Ural to work this last couple of weeks but as soon as the thaw is over and I’ll get the bike into the garage I’m going to refit the Boyer system and Yamaha ignition switch to see if that fixes things. Then the bike needs a repaint as it is begining to look a bit tatty. Especially as the filler layers that the Chinese had used on the tank have reacted with modern Norwegian petrol and blistered up.
You’d be surprised at the number of bikes still puttering about this time of year. The toughest of them all ride mopeds. Long after all the Harley riders have retired to their nice warm garages these madmen are still put-put-putting their merry way through blizzard over icy roads.
Incidently, I would appreciate it if somebody out there who is on Russian Iron could ask them to please unlock my account. Since it changed owners I haven’t been allowed in.
comment: JD: Hi Bill I’ve posted your request on Russian Iron, hopefully they can let you back in… http://www.russianiron.com/forums/index.php?showtopic=13777&pid=124296&st=0&#entry124296 Pity about your winter rally.
comment JD: 15 March 2012: Hi Bill, good to see you are back on RI, and anyone who has read all this should also read this by MotoJ for more M-72 wisdoms: http://www.russianiron.com/forums/index.php?showtopic=13711
comment: JD: Hi Bill, I meant to ask you if your Changs fuel tank ever had Knee rubbers, and if so what type, ie, M-72 triangular pads, and why the Chinese ever did away with thye glovebox will forever be a mystory, mind you even Ural seem to have done away with it, unless you pat for it as an optional extra these days. Even the basic Ural tool kit seems to be an optional extra. All bikes used to come with a full tool-roll of tools.
comment: changlove4ever: 25 March 2012: Hi Bill
I have a good bike of everthing Russia and Chinese It runs very good having chinese Cylinders and pistons but the engine house is russia and the camshaft and the crankshaft are russia none the less it is a good runing motorbike and we’re having great fun to even when it broke parts are easy but do not get new parts for a small chop in China changjiangunlimited is very good for your parts and so is changjiangcollective Hey have good fun life is short PS And JD A copy of a Bmw R71 is having knee rubbers or perhaps gastank handles for the gears best regards enno
[END of mirrored copy of Bill’s blog from our old Multiply site]
update: Bill has found us again!
29 November 2020:
Bloody hell! Bcozz is still alive! Just re-discovered the site after a sojourn on planet Ducati. Back on a K750 and Ural coz it’s fun. Nice to see a lot of stuff recovered and added after the Great Crash. Hope you guys are all well.
SKÅL
Note to Bill: sorry that it’s taken so long to restore your blog here. It has been missed! But the good news is it’s back up on b-Cozz. PS It’s probably also the longest post on this site!
Maybe I’ll have to dig and try and find Gautrek’s stuff as well. He did some weird stuff. -JD
Some help needed, I have a “Dneprglide” gearbox with an fault !
In second gear it looks like it goes faster and slower constantly.
So I shift very quick in third, no problems at all.
Mentioned causes, takes another gear the same time, oval gear, friction with another gear !
How do I find out what the problem is, and more how do I fix it !!
PS another member of the UDCN has the same problem in third !
Michael from Denmark would like to know more about the frame he has !
hi John,
thanks for helping me. I would really like to know which model it is,first the holes has always there.They have not been weld later on.
Thought a BMW R75 engine would fit inside it,from hole to hole is around 33,5 cm.
Where I have my finger is on the steeringhead,is a very littel stamp,se the photo with my drawing number 1.There is not stamped anything on the frame any place as the normal.The frame at the back is a original R71 frame,just for see how close it looks. Where I have my finger at the rearbrake plate, is stamped the things you see on my drawing number 2. The frame is without the reinforcement at the back suspension
I have a Dnepr/Ural “stubby” front fork. It’s a nice piece of engineering but I don’t need it–my only Eastern motorcycle is a 1951 BMW-SAG R35/2 (EMW). Is there a classifieds section to your website? The fork is complete except for the upper triple-tree. It looks straight, and the headlight ears are nice. The rubber bump stops aren’t too hard. Is the steering tube supposed to be parallel to the fork legs? It’s not–it leans back a few degrees. I am in Baltimore, Maryland U.S.A.